

Introduction
This article explores the delightful Holiday Peanut Butter Kiss Cookies, a sweet treat that embodies the spirit of the festive season. Combining creamy peanut butter and chocolate, these cookies deliver a perfect balance of flavors and textures. The unique combination of rich peanut butter and the sweetness of chocolate kisses creates a comforting and indulgent snack that is sure to please everyone. Whether you are baking for a gathering or simply to enjoy at home, these cookies are sure to bring joy to your palate.
During the holidays, the kitchen often becomes a gathering place, filled with warmth and delicious aromas. These cookies not only taste heavenly but also bring a sense of nostalgia and celebration to your holiday festivities. Their simple yet sweet profile makes them suitable for various occasions—from holiday parties and family get-togethers to thoughtful gifts for loved ones. Make a big batch, and you’ll have plenty to share, ensuring that your festive spirit spreads far and wide!
Recipe Overview
Creating Holiday Peanut Butter Kiss Cookies is an enjoyable and straightforward process. This recipe yields 24 cookies, making it perfect for sharing among friends and family. With a total preparation time of just 25 minutes, it’s an easy choice for both novice and experienced bakers alike.
Key Features
– Festive flavor combination of peanut butter and chocolate
– Quick preparation and baking time
– Ideal for holiday gatherings
Serving Suggestions
– Great for parties and family gatherings
– Perfect as holiday gifts when packaged attractively
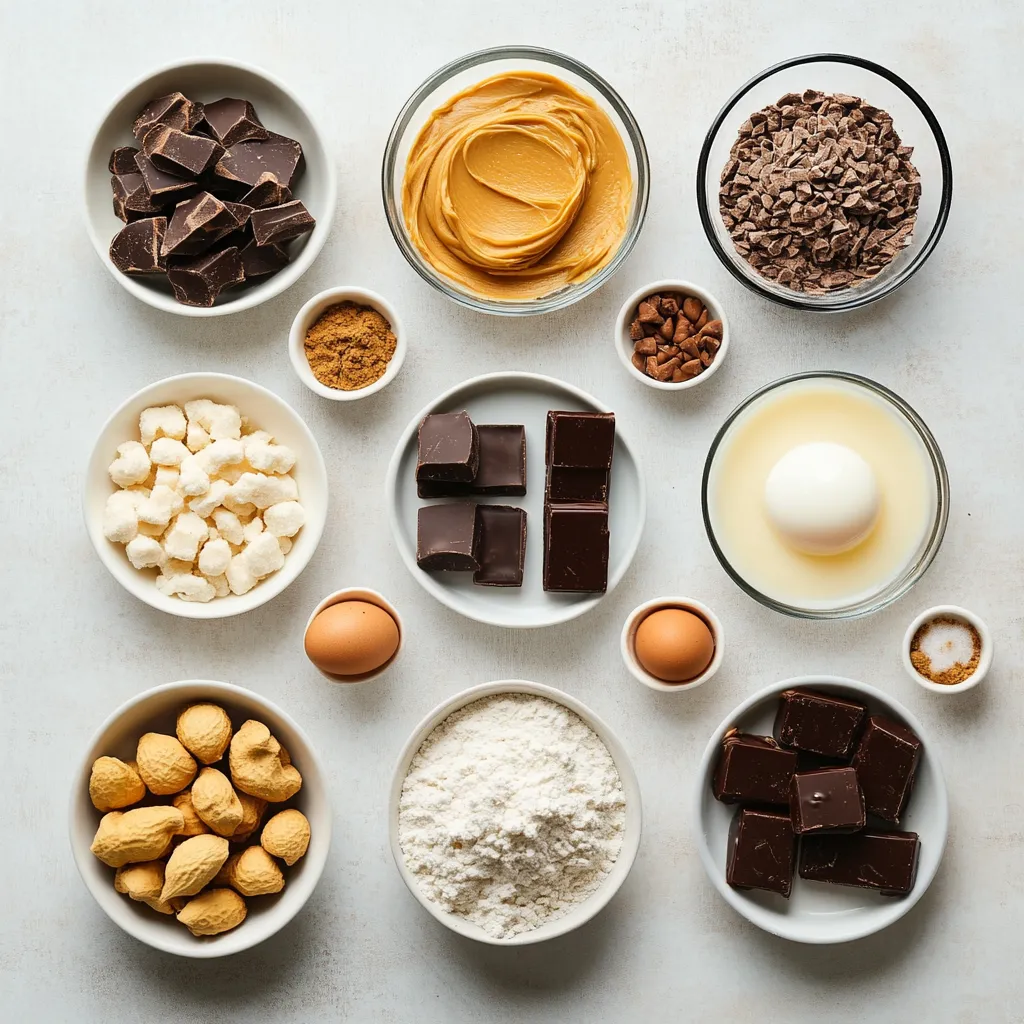
Ingredients
This recipe calls for a harmonious blend of simple yet essential ingredients. Below is a detailed list of what you’ll need to create these delicious cookies:
– 1 cup creamy peanut butter
– 1 cup granulated sugar
– 1 cup packed brown sugar
– 1 large egg
– 1 teaspoon vanilla extract
– 1 teaspoon baking soda
– 1/4 teaspoon salt
– 1 cup all-purpose flour
– 24 chocolate kisses, unwrapped
– Additional granulated sugar for rolling
Instructions
The preparation of these cookies is quick and straightforward. Each step is designed to ensure delicious results.
1. Begin by preheating your oven to 350°F (175°C). Prepare a baking sheet by lining it with parchment paper to prevent sticking.
2. In a large mixing bowl, add the creamy peanut butter, granulated sugar, brown sugar, egg, and vanilla extract. Mix these ingredients together using a hand mixer or a whisk until the mixture is smooth and thoroughly combined.
3. In a separate bowl, combine the baking soda, salt, and all-purpose flour. Whisk these dry ingredients together until they are evenly mixed. Gradually incorporate the dry mixture into the wet peanut butter mixture, stirring gently until just combined. Be careful not to overmix; a few flour streaks are okay.
4. Take small portions of the dough and roll them into 1-inch balls. Then, roll each ball in granulated sugar to create a sweet coating. Place the sugared balls on the prepared baking sheet, ensuring they are spaced about 2 inches apart to allow for spreading during baking.
5. Bake the cookies in the preheated oven for 8-10 minutes, or until the edges are lightly golden but the centers remain soft.
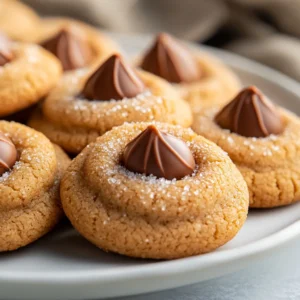
6. As soon as you remove the cookies from the oven, gently press a chocolate kiss into the center of each cookie. Allow the cookies to cool on the baking sheet for 5 minutes before transferring them to a wire rack to cool completely.
7. Share these delightful cookies with family and friends, spreading the joy of the holiday season!
Preheating the Oven
Before you even start combining ingredients, it’s vital to preheat your oven to 350°F (175°C). This temperature is ideal for baking these cookies, allowing them to rise perfectly while maintaining their soft centers. Preheating ensures that your cookies bake evenly and achieve the desired texture—golden edges with soft, chewy interiors.
Mixing the Wet Ingredients
In the large mixing bowl, combine the creamy peanut butter, granulated sugar, packed brown sugar, large egg, and vanilla extract. Using a hand mixer or a whisk, you want to blend these ingredients until smooth and well incorporated. This step is crucial as the peanut butter forms the rich base of your cookies, while the sugars add sweetness and moisture, supporting a delightful mouthfeel.
Whisking the Dry Ingredients
In a separate bowl, gather the dry components: baking soda, salt, and all-purpose flour. Whisking them together helps distribute these ingredients evenly, preventing any clumping as you incorporate them into the wet mixture. Baking soda plays an essential role in giving the cookies a bit of lift, working with the moisture from the sugars and egg.
Combining Wet and Dry Mixtures
The next step involves gradually adding the dry ingredients to the wet mixture. This should be done gently, stirring until the two mixtures are just combined. Don’t worry if you see a few flour streaks—overmixing can lead to tough cookies, so it’s best to stop mixing as soon as you see no dry flour. The goal is to maintain a soft and pliable dough that will yield tender cookies.
Shaping the Cookies
The shaping process is crucial for the final presentation and texture of the cookies.
Forming Dough Balls
Take small portions of the dough and roll them into 1-inch balls. Each ball should be exactly the same size to ensure even baking. After rolling them into balls, roll each one in additional granulated sugar to create a sweet outer layer. This step not only adds to the aesthetic appeal but also enhances the sweetness, offering a delightful contrast to the creamy peanut butter base. Place the sugared balls on the prepared baking sheet with enough space—about 2 inches apart—to allow for spreading during baking, which is vital for achieving the right texture.
Rolling into 1-inch Balls for Uniformity
Creating uniform cookie balls is essential for achieving evenly baked cookies. Each dough ball should be approximately 1 inch in diameter. This consistency ensures that all cookies bake evenly within the same time frame. Using a cookie scoop can help maintain this size, or you can simply use your hands. Working them into smooth rounds helps create a pleasing shape and promotes even baking.
Rolling in Sugar
To enhance the cookies both in flavor and visual appeal, each ball is rolled in granulated sugar before baking. This step is not just for sweetness; it creates a delightful, sparkling coating that enhances the cookie’s aesthetic look. The sugar crust caramelizes slightly during baking, adding a touch of crunch to the exterior, which beautifully contrasts the soft center.
Effect: Creates a Sweet, Sparkly Coating
This sugary coating not only enhances the taste profile by adding an extra layer of sweetness but also gives the cookies an eye-catching sheen. The sparkly texture becomes visually appealing, making them perfect for holiday gatherings and celebrations.
Arranging on Baking Sheet
Arranging the rolled dough balls properly on the baking sheet is a crucial step in baking. After rolling the balls in sugar, place them on your lined baking sheet with ample space around them.
Spacing: Place Balls about 2 Inches Apart
Spacing is critical; it’s essential to leave around 2 inches between each cookie ball. This distance allows the cookies to spread properly while they bake. Overcrowding can lead to cookies sticking together, compromising both their shape and texture.
Purpose: Allows for Spreading During Baking
As the cookies bake, the heat causes the dough to expand, leading to a beautiful round shape. Proper spacing allows the cookies to achieve the right amount of spread without merging into each other, ensuring ideal presentation and bite-sized enjoyment.
Baking the Cookies
This is the moment where the magic happens, transforming raw dough into delightful cookies. The meticulous mixing of ingredients culminates in a baking process that produces cookies infused with rich flavors and appealing textures.
Baking Instructions
Preheat your oven to a temperature of 350°F (175°C), ensuring it reaches the right temperature for even baking. The cooking time ranges from 8 to 10 minutes.
Duration: Bake for 8-10 Minutes
By baking the cookies for this duration, they will develop that ideal crispy edge while maintaining a soft and chewy center. It is important to monitor them closely, as baking times can vary depending on your specific oven’s characteristics.
Visual Cue: Edges Should be Lightly Golden While Centers Remain Soft
Keep an eye on the edges of the cookies. They should turn a light golden brown, while the centers should look slightly underbaked or puffy. This visual cue ensures that you achieve the delightful texture characteristic of peanut butter kiss cookies.
Post-Baking Action
Once you remove the cookies from the oven, there’s a timely action to undertake.
Immediately Press a Chocolate Kiss into Each Cookie
The addition of a chocolate kiss into the warm, freshly baked cookies is a signature step. Press each kiss gently into the center of the cookie.
Timing is Key for the Perfect Melty Center
Doing this immediately after they come out of the oven is crucial, as the warmth of the cookie allows the chocolate to melt just right, creating that gooey center that is both visually appealing and adds an irresistible taste contrast.
Cooling Process
Cooling cookies correctly ensures they maintain the right texture for serving.
Cooling on the Baking Sheet
After baking, allow the cookies to cool on the baking sheet for about 5 minutes. This initial cooling period helps them set properly.
Duration: Allow Cookies to Cool for 5 Minutes
This wait time allows any extra moisture to escape and helps firm the cookie up enough so it doesn’t fall apart when transferred.
Purpose: Settles the Cookie Structure
Letting the cookies cool briefly on the baking sheet helps in developing a stable structure, preventing them from crumbling during the transferring process.
Transferring to Wire Rack
After the initial cooling, it’s essential to transfer the cookies to a wire rack for complete cooling.
Essential for Complete Cooling
A wire rack allows airflow around the cookies, preventing moisture buildup that can lead to sogginess.
Helps Prevent Sogginess
By transferring the cookies to a wire rack, you’re ensuring they maintain a charming texture that combines a crispy exterior with a soft and chewy interior.
Presentation Tips
Enhancing the visual appeal of these cookies can make them even more festive.
Creative Arrangements
Presenting the cookies thoughtfully can enhance the enjoyment they bring to gatherings.
Use Decorative Platters to Display Cookies
Arrange the cookies on a decorative platter that matches the occasion. This not only adds a charming touch but also showcases your baking efforts beautifully.
Packaging Ideas
If looking to gift these cookies, consider baking a larger batch and packaging them attractively.
Holiday-Themed Cookie Boxes Make Great Gifts
Use holiday-themed cookie boxes or tins for gifting. It adds a personal touch and can make the gift feel extra special.
Suggestion: Sprinkle Edible Glitter for a Festive Flair
Sprinkling edible glitter over the top before serving can add a touch of festive sparkle that captivates the eye.
Flavor Profile
Understanding the taste of these cookies helps in appreciating their delicious character.
Sweet and Salty Balance
The combination of creamy peanut butter with the rich chocolate creates a harmonious blend of flavors—savory meets sweet.
Creamy Peanut Butter Paired with Rich Chocolate
This balance not only satisfies the sweet tooth but also appeals to those who appreciate a rich, nutty flavor profile.
Sugary Exterior Adds to the Overall Sweetness
The rolled sugar provides a dual experience of textures—crunchy on the outside and soft on the inside.
Texture Highlights
The texture of these cookies is equally alluring.
Soft Center with a Slightly Crispy Edge
This contrast in texture makes for a delightful mouthfeel.
The Melting Chocolate Kiss Provides a Delightful Texture Contrast
As you bite into the cookie, the warm, melted chocolate fills the mouth, complementing the dense peanut butter dough.
Storage Solutions
Proper storage is essential for maintaining the freshness of the cookies.
Short-Term Storage
To keep the cookies at their best for a few days, store them in an airtight container at room temperature. This method preserves moisture and softens hard edges.
Store in an Airtight Container at Room Temperature
It’s crucial to keep them sealed to prevent drying out, helping to maintain that perfect texture and flavor.
Ideal for a Few Days of Freshness
These cookies are best consumed within a week when stored this way, as the flavors are most vibrant.
Long-Term Storage
If you plan on making these cookies in advance or want to save some for later, freezing is an excellent option.
Freeze Cookies for Extended Shelf Life
Once they are completely cooled, you can freeze the cookies.
Best to Separate Layers with Parchment Paper
Layer the cookies with sheets of parchment paper to avoid them sticking together during freezing. This method allows you to easily grab as many cookies as you want without thawing the entire batch.
Nutritional Information
A brief overview of the nutritional aspects of these cookies can be beneficial for many.
Caloric Content
The caloric content is not specified in the recipe; however, considering the main ingredients, be mindful as these cookies are on the richer side owing to the nut butter and sugars, making them a delightful treat in moderation.
In summary, the Holiday Peanut Butter Kiss Cookies offer a delightful balance of sweet and salty flavors with their soft centers and slightly crispy edges. Baking them takes a short time, and the care you take in each step ensures they maintain their integrity for sharing or gifting during the holiday season.
Holiday Peanut Butter Kiss Cookies Recipe
Ingredients
- 1 cup creamy peanut butter
- 1 cup granulated sugar
- 1 cup packed brown sugar
- 1 large egg
- 1 teaspoon vanilla extract
- 1 teaspoon baking soda
- ¼ teaspoon salt
- 1 cup all-purpose flour
- 24 chocolate kisses unwrapped
- additional granulated sugar for rolling
Instructions
-
Preheat your oven to 350°F (175°C) and line a baking sheet with parchment paper.
-
In a large bowl, mix peanut butter, granulated sugar, brown sugar, egg, and vanilla until smooth.
-
In a separate bowl, whisk together baking soda, salt, and flour.
-
Gradually add the dry mixture to the wet mixture, stirring gently until just combined.
-
Roll the dough into 1-inch balls and coat them in granulated sugar.
-
Place the balls on the baking sheet, spaced 2 inches apart.
-
Bake for 8-10 minutes until edges are golden and centers are soft.
-
Press a chocolate kiss into the center of each cookie immediately after baking.
-
Cool on the baking sheet for 5 minutes, then transfer to a wire rack to cool completely.
-
Share and enjoy these festive cookies with family and friends.