

Introduction
The world of desserts is continually evolving, with no-bake options soaring in popularity due to their simplicity and delightful outcomes. No-bake desserts, including the Indulgent No-Bake Oreo Truffles, allow even novice bakers to create something special and impressive without the use of an oven. These truffles are the epitome of indulgence, delivering a rich and creamy flavor character that is sure to satisfy any sweet tooth.
What makes these truffles particularly appealing is their base of crushed Oreo cookies combined with softened cream cheese, which results in an irresistible blend of chocolatey and creamy goodness. The fact that they come together in mere minutes and do not require any baking time further solidifies their status as a go-to dessert for any occasion, from casual family gatherings to fancy dinner parties.
The combination of chocolate and cream cheese gives these truffles a unique taste and texture that set them apart from traditional desserts. When served chilled, they melt in the mouth, delivering a burst of flavor that is both comforting and decadent.
Recipe Overview
– Total Time: 1 hour
– Servings: 24 truffles
– Difficulty: Not specified in the recipe
No-Bake Oreo Truffles are perfect for celebratory occasions or simply as a delightful treat to enjoy at home. Not only are they easy to prepare, but they can also be customized with various toppings and flavorings, allowing you to get creative. The simplicity of this recipe combined with its appealing chocolate-laden flavor profile makes it a popular choice to satisfy everyone’s cravings.
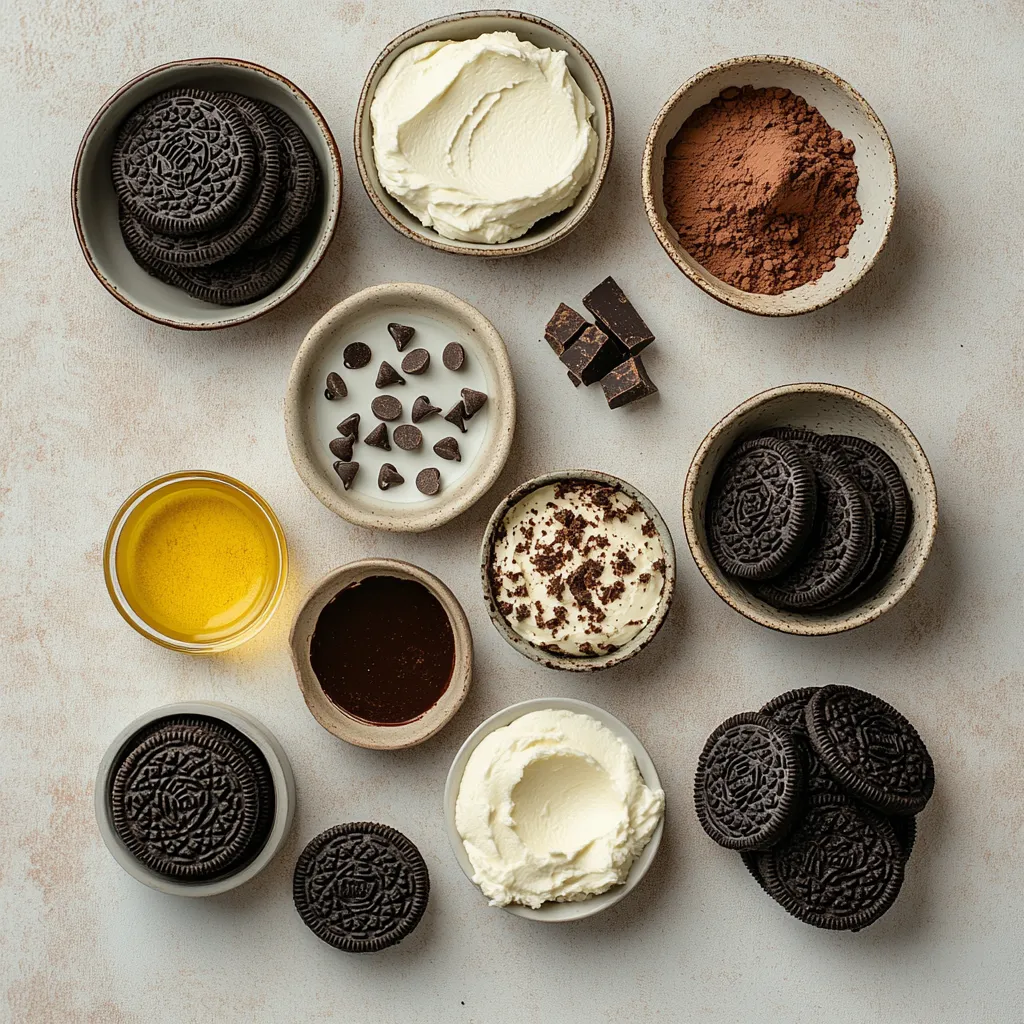
Ingredients
– 36 Oreo cookies, finely crushed
– 8 oz cream cheese, softened to room temperature
– 1 tsp pure vanilla extract
– 12 oz semi-sweet chocolate chips
– 1 tbsp coconut oil (optional, for a glossy finish)
– Additional crushed Oreos or cocoa powder for dusting
When preparing these truffles, it is vital to have all ingredients ready. The cream cheese must be at room temperature to ensure easy mixing, resulting in a smooth and cohesive mixture without lumps. The choice of chocolate chips plays an essential role in the overall taste, and while semi-sweet chocolate chips are specified, feel free to adapt this recipe with chocolate options that suit your preferences or dietary requirements.
Instructions
1. In a spacious mixing bowl, combine the finely crushed Oreo cookies and the softened cream cheese. Mix thoroughly using a spatula or your hands until the mixture is smooth and well-blended.
2. Incorporate the vanilla extract into the mixture and stir until evenly distributed.
3. With clean hands, take small amounts of the mixture and roll them into balls, approximately 1 inch in diameter. Arrange the formed truffles on a baking sheet lined with parchment paper.
4. Once all the truffles are shaped, place the baking sheet in the refrigerator for about 30 minutes to allow them to firm up.
5. While the truffles chill, melt the semi-sweet chocolate chips in a microwave-safe bowl. Heat in 30-second intervals, stirring after each, until the chocolate is completely smooth. If you prefer a shinier appearance, mix in the coconut oil.
6. After the truffles have chilled, remove them from the refrigerator. Using a fork, dip each truffle into the melted chocolate, letting any excess chocolate drip off before placing them back onto the parchment-lined baking sheet.
7. While the chocolate is still wet, sprinkle the tops of the truffles with crushed Oreos or cocoa powder to add a decorative touch.
8. Once all the truffles are coated, return them to the refrigerator for an additional 15-20 minutes, or until the chocolate has fully set.
9. Serve the truffles chilled and savor the rich flavors of your delightful No-Bake Oreo Truffles!
Chilling the Mixture
Chilling the truffles after shaping them is a critical step that shouldn’t be overlooked. This process allows the mixture to firm up significantly, which helps in handling the truffles during the coating phase. The cooling period of about 30 minutes not only ensures that the truffles hold their shape but also enhances the overall texture. A firmer mixture makes it easier for you to dip the truffles into the melted chocolate, preventing them from losing their round shape and integrity.
To maximize the chilling time for a perfect texture, you can prepare the truffles earlier in the day or even the night before. As they chill, they develop a firmer consistency that results in a delightful bite when served. This step is essential for achieving the desired control and smoothness when coating the truffles in rich chocolate.
Melting Chocolate
Melted chocolate is a fundamental component in the coating of these delicious truffles. The process of melting chocolate chips must be done with caution, as overheating can lead to a dry and unusable chocolate. Opt for the microwave method using a microwave-safe bowl, and heat the chocolate in 30-second intervals, stirring continuously after each interval. This gentle warming allows the chocolate to melt evenly without burning.
Incorporating coconut oil into your melted chocolate can enhance its consistency, giving it a glossy finish that not only looks appealing but also makes the chocolate easier to dip into. This optional step elevates the truffle’s presentation, providing a professional touch to your homemade dessert. Be mindful not to add too much, as just one tablespoon is sufficient to achieve that shine without altering the rich chocolate flavor.
Coating the Truffles
Coating the chilled truffles in melted chocolate is where the magic truly happens. This step transforms the simple cookie-cream cheese mixture into a luxurious treat that looks as good as it tastes. After your melted chocolate is ready, remove the truffles from the refrigerator and prepare to coat them thoroughly. Using a fork, dip each truffle, ensuring an even coating while allowing excess chocolate to drip back into the bowl.
As a finishing touch, during this wet stage, sprinkle crushed Oreos or cocoa powder on top to enhance both flavor and presentation. These toppings add visual appeal and further depth to the already rich indulgence. Finally, placing the coated truffles back in the refrigerator for an additional setting period ensures a firm shell, sealing in the creamy filling and enhancing the delightful textural contrast found within each bite.
Detailed Guidance on the Chocolate Coating Process
The chocolate coating is pivotal in the creation of No-Bake Oreo Truffles, as it provides not only a flavorful shell but also a visually appealing finish. Proper technique during this phase can elevate the overall presentation and enjoyment of the truffles. When melting the chocolate chips, it is vital to do so in a microwave-safe bowl, opting for 30-second intervals to prevent burning. Stirring after each interval ensures the chocolate heats evenly, crucial for achieving that smooth, pourable texture.
Once the chocolate is melted, you have the option to introduce coconut oil. This step is not mandatory, but it enhances the chocolate’s sheen, making it more attractive and glossy. If choosing to skip the coconut oil, ensure that the melted chocolate is still of a suitable consistency for coating—if it’s too thick, it may not adhere well to the truffles.
Techniques for Achieving Even Coverage and Preventing Clumping
Achieving an even layer of chocolate requires careful handling. Use two forks or a slotted spoon to keep the truffle from becoming fully submerged, allowing excess chocolate to drip off effectively. Another tip is to rotate the truffle gently while dipping to ensure all surfaces are coated smoothly.
If clumping occurs around the fork after dipping, it’s advisable to tap the utensil gently on the bowl’s edge before putting the truffle back on the baking sheet. This will allow any chocolate clumps to fall away, resulting in a cleaner finish.
Decorative Touches
Enhancing the visual appeal of your No-Bake Oreo Truffles can be done beautifully with a few simple touches. Dusting the tops of the truffles with additional crushed Oreos or sifted cocoa powder creates a decorative contrast against the chocolate coating. This addition not only looks stunning but also amplifies the Oreo flavor.
For those seeking a bit more variety, consider using colored sprinkles or finely chopped nuts, such as pecans or almonds, to add texture and aesthetic interest. These alternatives allow for personalization and creativity while maintaining the original flavor profile. When arranging the truffles on a serving platter, placing them in a circular pattern or in neat rows can create a visually pleasing display, perhaps with a few whole Oreos or miniature chocolate bars placed strategically around them to tie the theme together.
Chilling After Coating
After the truffles have been coated in chocolate, a second chilling period is necessary. This ensures that the chocolate sets firmly, creating a satisfying crunch when bitten into. The timeframe for this chilling phase is generally an additional 15-20 minutes. This step is crucial, as it solidifies the chocolate coating, keeping it intact while the truffles are served or transported.
To check if the chocolate coating has properly set, lightly press a truffle with a fingertip; it should feel firm to the touch, and the chocolate coating should not be tacky. If it leaves a smudge, place it back in the refrigerator for a few more minutes.
Storage Tips
For optimal freshness, it’s vital to store No-Bake Oreo Truffles properly. These delectable treats can be kept in the refrigerator for up to one week. Make sure they are placed in an airtight container to avoid absorbing odors or moisture.
Alternatively, if you’re looking to extend their shelf life, consider freezing the truffles. When frozen correctly, they can last for up to three months. It’s best to freeze them individually on a baking sheet first, allowing them to firm up before transferring them to a freezer-safe container. Ensure to place parchment paper or wax paper between layers to avoid sticking.
When ready to enjoy, transfer the frozen truffles to the refrigerator to thaw—this should take about 30 minutes. Avoid leaving them out at room temperature for extended periods, as this could cause the chocolate to sweat and lose its desirable texture.
Serving Suggestions
No-Bake Oreo Truffles are perfect for various occasions, from casual family gatherings to festive celebrations. They can serve as delightful party favors or sweet additions to a dessert table.
Pairing suggestions include offering these truffles alongside coffee, milk, or even a dessert wine, enhancing the experience with complementary flavors. For parties, creating a dessert platter can elevate the display – arrange the truffles on a large serving dish, adding fresh fruit, cookies, or chocolate-dipped pretzels among them for a visual feast.
These truffles are also a fantastic treat for holiday celebrations, as they can be easily dressed in festive colors by adjusting the toppings according to the season (e.g., red and green crushed candy for Christmas or pink sprinkles for Valentine’s Day).
Nutritional Information
When indulging in these No-Bake Oreo Truffles, one must consider their nutritional aspects. Each truffle can be rich in calories due to ingredients like cream cheese, chocolate chips, and cookies, making moderation essential. However, this treat can be adapted for various dietary preferences by ensuring use of gluten-free Oreos or chocolate to accommodate those with specific restrictions.
It is worth noting that while these truffles are indeed indulgent, served in moderation, they can fit within a balanced diet, especially during special occasions. They provide a rich flavor profile and a delightful combination of creamy and crunchy textures that create a satisfying dessert experience.
Conclusion
The No-Bake Oreo Truffles deliver a rich, decadent flavor and a smooth, pleasing texture that’s hard to resist. With their straightforward preparation time of just one hour, these treats come together with ease, making them an excellent choice for any event. The delightful contrast between the creamy interior and the crisp chocolate coating captures the essence of indulgence perfectly.

Indulgent No-Bake Oreo Truffles Recipe
Ingredients
- 36 pieces Oreo cookies finely crushed
- 8 oz cream cheese softened to room temperature
- 1 tsp pure vanilla extract
- 12 oz semi-sweet chocolate chips
- 1 tbsp coconut oil optional, for a glossy finish
- to taste Additional crushed Oreos or cocoa powder for dusting
Instructions
-
In a mixing bowl, combine the crushed Oreo cookies and softened cream cheese until smooth.
-
Incorporate the vanilla extract and mix until evenly distributed.
-
Roll the mixture into 1-inch balls and place on a parchment-lined baking sheet.
-
Refrigerate for about 30 minutes to firm up the truffles.
-
Melt the chocolate chips in a microwave-safe bowl, stirring every 30 seconds until smooth.
-
If desired, mix in coconut oil for a shinier appearance.
-
Dip each truffle into the melted chocolate and let excess drip off.
-
Sprinkle crushed Oreos or cocoa powder on top while the chocolate is wet.
-
Return the truffles to the refrigerator for 15-20 minutes until the chocolate sets.
-
Serve chilled and enjoy your No-Bake Oreo Truffles!