

Introduction
The enchanting aroma of freshly baked cookies wafting through the house is a hallmark of the Halloween season. These Spooky Halloween Sugar Cookies are not just a treat for your taste buds, but they also bring a flair of festivity to any gathering. Ideal for parties, trick-or-treaters, or simply indulging in an afternoon snack, these cookies combine classic sugar cookie flavors with vibrant colors and playful designs, capturing the spirit of Halloween in every bite.
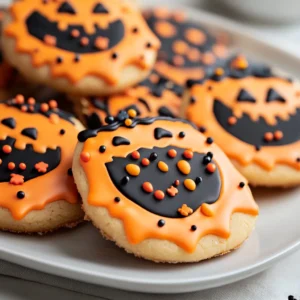
With their delightful orange and black hues, along with assorted Halloween-themed sprinkles, these cookies not only taste sweet but look visually appealing as well. They are versatile enough to suit any occasion during the spooky season—perfectly complementing your festive decor or serving as delightful gifts when attending Halloween parties.
In addition, baking these cookies is an enjoyable experience that can be shared with family and friends. The entire process—from mixing the dough to rolling it out and cutting out fun shapes—provides a wonderful opportunity for bonding over a shared love of delicious treats filled with seasonal charm.
Recipe Overview
Spooky Halloween Sugar Cookies are a delightful addition to any Halloween celebration. This recipe walks you through the preparation of colorful, soft, and sweet sugar cookies that are decorated festively. With a total time of one hour, you’ll make approximately 24 cookies, each containing around 150 calories. Whether you are an experienced baker or a novice, this step-by-step guide will help you create enchanting treats with ease.
– Prep Time: 30 minutes
– Cook Time: 10 minutes
– Total Time: 1 hour
– Course: Dessert
– Cuisine: American
– Servings: Approximately 24 cookies
– Calories: ~150 per cookie
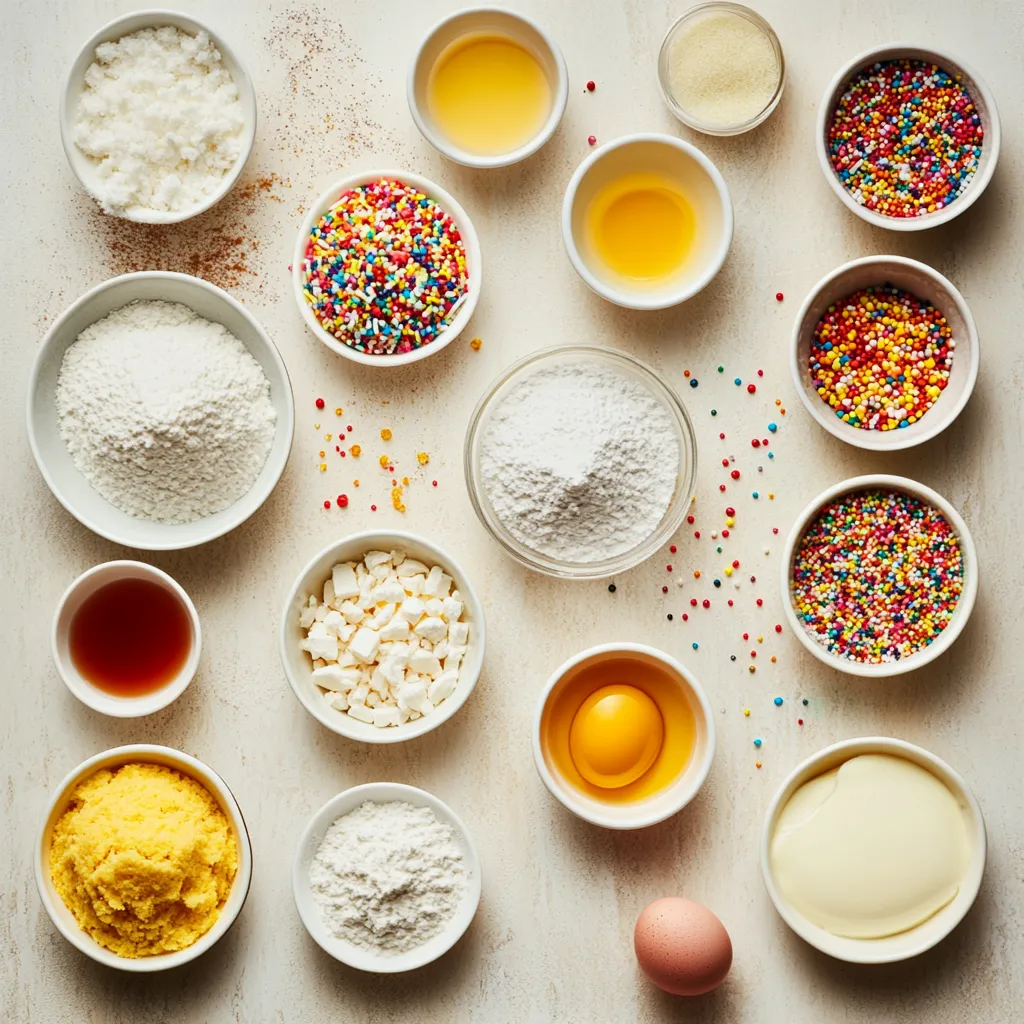
Ingredients
– 2 ¾ cups all-purpose flour
– 1 teaspoon baking powder
– ½ teaspoon salt
– 1 cup unsalted butter, softened to room temperature
– 1 ½ cups granulated sugar
– 1 large egg
– 1 teaspoon pure vanilla extract
– 1 teaspoon almond extract
– Orange gel food coloring
– Black gel food coloring
– Assorted Halloween-themed sprinkles
Instructions
1. Preheat your oven to 350°F (175°C) and prepare your baking sheets by lining them with parchment paper.
2. In a medium mixing bowl, combine the flour, baking powder, and salt. Whisk them together thoroughly and set the bowl aside for later use.
3. In a large mixing bowl, beat the softened butter and granulated sugar together using an electric mixer until the mixture becomes light and fluffy, typically about 3-4 minutes.
4. Add the egg, vanilla extract, and almond extract to the butter-sugar mixture. Beat until everything is well incorporated and smooth.
5. Gradually mix in the reserved dry ingredients from the medium bowl. Stir until just combined; be careful not to overmix.
6. Divide the cookie dough into two equal halves. Use orange gel food coloring to tint one half and black gel food coloring for the other, mixing until the colors are vibrant and evenly distributed.
7. Roll each colored dough between two sheets of parchment paper to a thickness of about ¼ inch. Once rolled, refrigerate the dough for 30 minutes to firm it up.
8. After chilling, use Halloween-themed cookie cutters to cut out festive shapes from the dough. Place the cutouts onto the prepared baking sheets, spacing them a couple of inches apart.
9. Before baking, generously sprinkle the cookie shapes with an assortment of Halloween-themed sprinkles for a fun touch.
10. Bake the cookies in the preheated oven for 8-10 minutes, or until the edges are just turning lightly golden. Allow them to cool on the baking sheets for a few minutes before transferring them to wire racks to cool completely.
11. If desired, decorate your cookies with icing to add an extra layer of spookiness!
Baking Preparation
Preheating the Oven
Understanding the importance of preheating your oven ensures that the cookies bake evenly, resulting in the perfect texture. Set your oven to 350°F (175°C) to start. Preheating the oven for the right amount of time allows for a properly heated cooking environment which is crucial for achieving that golden edge on your sugar cookies. Without preheating, the baking time can be off, and you could end up with cookies that are underbaked or unevenly cooked. This simple step lays the foundation for perfectly baked cookies.
Preparing Baking Sheets
Learn how to properly line your baking sheets with parchment paper. This not only prevents sticking but also makes clean-up a breeze. Placing parchment paper gives a non-stick surface to your cookies, allowing them to release without any challenge. When lining your baking sheets, ensure that the parchment paper fits snugly in the corners and doesn’t sag, as this could affect how the cookies spread during baking.
Measuring Ingredients
Explore best practices for accurately measuring both dry and wet ingredients. This detail is crucial for maintaining the intended texture and flavor of your cookies. For dry ingredients like flour and baking powder, using the spoon-and-level method is highly recommended: spoon the flour into your measuring cup and level it off with a knife for accuracy. For soft ingredients like butter, using room temperature is vital; this helps in blending smoothly with the sugar, creating that light and airy texture we’re aiming for.
Mixing Dry Ingredients
Combining Flour, Baking Powder, and Salt
Master the technique of whisking dry ingredients in a medium bowl. This step is critical for evenly distributing the baking powder and salt throughout the flour, which ensures that your cookies will rise properly and taste well-balanced. Whisking helps prevent clumps of baking powder or salt. By taking the moment to mix these ingredients carefully, you’re setting the stage for cookies that are uniformly delicious.
Setting Aside Dry Ingredients
Tips on how to effectively set aside your dry mix for later incorporation into the wet ingredients, ensuring a well-structured cookie dough. Keeping your dry ingredients separately prepared makes your mixing process smoother and less chaotic. It allows for clear transitions as you combine the ingredients, preventing you from having to measure things out at the last second when you are itching to see your cookies come together. This organized approach results in a more enjoyable baking experience.
Creaming Butter and Sugar
Preparing the Butter
Learn why using softened butter is essential and how to achieve the perfect consistency before beginning to mix. Softened butter has a creamy and pliable consistency that allows it to incorporate well with the sugar, creating a mixture that traps air, crucial for the texture of the cookies. To soften butter properly, place it on the counter for about 30 minutes before use or cut it into smaller pieces to speed up the softening process.
Beating Butter and Sugar
A step-by-step guide on how to beat the butter and granulated sugar together until light and fluffy, typically for about 3-4 minutes. This aeration phase not only enhances the flavor but also influences the texture and height of your cookies. Beating the mixture until it is pale and fluffy will ensure that the sugar begins to dissolve, setting the stage for cookies that have a tender crumb.
Flavoring with Extracts
The fragrant duo of vanilla and almond extracts plays a pivotal role in elevating the flavor profile of these spooky Halloween sugar cookies. Vanilla extract is often associated with warmth and richness, contributing a sweet and creamy base note that complements the buttery flavor of the dough. On the other hand, almond extract introduces a slightly nutty and aromatic essence that can transform the taste experience altogether.
To ensure that both extracts are blended seamlessly into your cookie dough, it’s ideal to incorporate them with other wet ingredients after beating the butter and sugar. This method enables the flavors to meld properly, preventing any uneven spots that might arise if the extracts are added later. Make sure to beat these components together until the mixture appears uniform and smooth, allowing the flavors to enrich each other harmoniously.
Combining Wet and Dry Mixtures
Gradual Mixing
When it comes to mixing the dry ingredients into the wet mixture, a gradual approach is crucial. Start by adding a small portion of the flour mixture into the butter-sugar-egg blend, allowing it to integrate before adding more. This process not only makes it simpler to incorporate the dry ingredients but also helps maintain the dough’s desired texture.
Overmixing can lead to a tough consistency, which is an outcome you want to avoid for a sugar cookie, which should be soft and tender. After you’ve mixed in the final addition of dry ingredients, stop as soon as the flour is just incorporated. You might still see some small flecks of flour—this is perfectly normal and a sign that you’ve achieved the right consistency without overworking the dough.
Forming the Dough
Recognizing when your dough is ready for coloring and shaping is key. The dough should be smooth and slightly tacky but not overly sticky. A useful visual cue is to check for evenness—if it looks uniformly blended with no visible pockets of dry flour or streaks of butter, you’re good to go! Additionally, when you press the dough lightly, it should hold its shape without leaving too much residue on your fingers.
Coloring the Cookie Dough
Dividing the Dough
To create a vibrant and playful color scheme, it’s important to divide your freshly made cookie dough evenly. Using a bench scraper or a knife, cut the dough in half, making two nearly equal portions. This ensures both the orange and black parts will yield similar amounts of cookies, keeping the festive spirit alive in each batch.
Using Gel Food Coloring
Using gel food coloring is the best way to achieve those vivid orange and black hues. Gel coloring provides a concentrated color that combines effortlessly without altering the dough’s consistency. When mixing in the gel, start by adding a small amount and knead the dough until the color spreads throughout evenly.
It may take a few moments of kneading, but be patient. If you’re aiming for a deeper hue, gradually incorporate more gel food coloring until you’ve reached your desired intensity. Remember that the final color can appear slightly lighter when baked, so don’t hesitate to add a little extra.
Chilling the Cookie Dough
Importance of Refrigeration
Chilling the dough is not merely a suggestion but a crucial step in the cookie-making process. Refrigeration allows the fats in the dough to firm up, making it easier to roll out without sticking. Moreover, it enhances the overall flavor as it allows time for the ingredients to meld together. This cooling period also helps to prevent the cookies from spreading too much in the oven, resulting in that perfect thick and chewy texture.
Rolling Techniques
When rolling the chilled dough, using parchment paper is key to achieving even thickness while avoiding additional flour dusting, which can alter the cookie’s texture. Lay one sheet of parchment paper on your countertop, place the dough on top, and then cover with another sheet. Use a rolling pin to flatten the dough to about ¼ inch thickness, making sure the dough is evenly spread out. This technique helps in keeping a uniform shape, giving you beautifully consistent cookies when they’re baked.
Cutting Out Cookie Shapes
Halloween-Themed Cookie Cutters
This holiday is an excellent opportunity to unleash your creativity with cookie cutters! Popular shapes include ghosts, pumpkins, bats, and witches’ hats. Using themed cutters not only embodies the spirit of Halloween but also adds an extra layer of fun to your baking experience. For added creativity, you might mix and match colors for a more vibrant and festive platter.
Arranging on Baking Sheets
When arranging your cookie shapes on the baking sheets, make sure to leave enough space between each cookie; about two inches should suffice. This spacing allows for even baking and prevents any merging that may happen as the cookies spread in the oven. Take your time in placing them down, ensuring they are positioned attractively.
Decorating Cookies
Sprinkles and Icing
Decorating your cookies provides an opportunity to let your creativity soar. Assorted Halloween-themed sprinkles can be a delightful way to finish off these cookies, adding not just flavor but also a colorful presentation. Sprinkle them generously over the unbaked cookies for an enchanting touch.
For those looking to elevate their cookie designs even more, consider icing them after they’ve cooled completely. Royal icing or buttercream in shades of orange, black, or white can create intricate designs, from simple lines to more elaborate patterns. The icing can also elevate the treat’s visual appeal, perfectly fitting the spooky theme.
Presentation Tips
When it comes to presenting your cookies, a festive platter can transform your serving space. Arrange the cookies with care, perhaps using colorful Halloween-themed napkins underneath. Adding edible glitter or further sprinkles around the cookies can enhance the overall visual impact, ensuring a captivating treat for your guests.
Baking the Cookies
Optimal Baking Time
Baking these cookies requires focused attention on the timing. The cookies should be in the oven for eight to ten minutes for optimal texture and taste. They’re done when the edges have a delicate, light golden hue. Keep a keen eye on them, as baking time may vary by oven.
Cooling Process
Once the cookies are baked to perfection, allow them to cool on the baking sheets for a few minutes. This step enables the cookies to firm up slightly, making them easier to transfer them without breaking. After cooling slightly, carefully move them to wire racks to cool completely. This final step is essential in enhancing both flavor and texture.
Storing and Enjoying Cookies
Storage Tips
To keep your cookies fresh, store them in an airtight container at room temperature for several days. If you prefer your cookies softer, placing a slice of bread or a damp paper towel in the container can help maintain their moisture. Alternatively, if you choose to refrigerate them, place them in an airtight container to prevent them from absorbing other flavors.
Perfect Pairings
These delightful Halloween sugar cookies pair wonderfully with a glass of milk, hot chocolate, or a festive pumpkin spice latte. They can also serve as an enchanting addition to a Halloween party spread, complementing other sweet snacks or treats offered at the gathering.
In conclusion, these spooky Halloween sugar cookies are not only a festive treat but also a canvas for creativity and flavor. The combination of extracts and the meticulous process of preparation make for a delightful baking experience that can be savored seasonally. Enjoy the process, and happy baking!
Spooky Halloween Sugar Cookies Recipe
Ingredients
- 2 ¾ cups all-purpose flour
- 1 teaspoon baking powder
- ½ teaspoon salt
- 1 cup unsalted butter softened
- 1 ½ cups granulated sugar
- 1 large egg
- 1 teaspoon pure vanilla extract
- 1 teaspoon almond extract
- orange gel food coloring
- black gel food coloring
- assorted Halloween-themed sprinkles
Instructions
- Preheat your oven to 350°F (175°C) and line baking sheets with parchment paper.
- In a medium bowl, whisk together flour, baking powder, and salt; set aside.
- In a large bowl, beat softened butter and sugar until light and fluffy, about 3-4 minutes.
- Add egg, vanilla extract, and almond extract; mix until smooth.
- Gradually mix in dry ingredients until just combined; do not overmix.
- Divide dough in half; tint one half with orange gel and the other with black gel food coloring.
- Roll each dough between parchment paper to ¼ inch thick; refrigerate for 30 minutes.
- Use Halloween cookie cutters to cut out shapes and place them on prepared sheets.
- Sprinkle with assorted Halloween-themed sprinkles before baking.
- Bake for 8-10 minutes until edges are lightly golden; cool on racks.