

Baked salmon sushi is a delightful fusion of traditional sushi flavors and the comfort of warm, baked ingredients. This innovative dish brings together the artistry of sushi-making with the comforting, hearty appeal of baked components. Unlike classic sushi rolls that emphasize raw fish, baked salmon sushi offers a simple yet delicious alternative, making it perfect for both sushi enthusiasts and beginners alike. Whether you are a seasoned sushi lover or just dipping your toes into the world of sushi-making, this recipe is sure to impress with its rich flavors and satisfying textures.
In this article, we will guide you step-by-step through the process of creating this delectable dish, highlighting the essential ingredients and techniques to ensure perfect results every time. From understanding the crucial components to preparing the sushi rice and baking the salmon, each step is designed to help you achieve sushi perfection in your own kitchen.
Understanding the Ingredients
The Essential Components of Baked Salmon Sushi
To create an exceptional baked salmon sushi, understanding the key ingredients is crucial. Each component plays a significant role in achieving the desired flavor and texture that makes this dish so enjoyable.
Sushi Rice: The foundation of any sushi dish, sushi rice is a short-grain rice known for its sticky and slightly chewy texture. This unique consistency allows the rice to hold together well when formed into sushi rolls. The preparation of sushi rice involves rinsing to remove excess starch, which is essential for achieving the right texture. The flavor of the rice is enhanced with a mixture of rice vinegar, sugar, and salt, which adds a subtle tanginess that perfectly complements the richness of the salmon.
Fresh Salmon: The star of this dish, fresh salmon provides not only flavor but also essential nutrients. Rich in omega-3 fatty acids, protein, and vitamins, salmon contributes to both the taste and health benefits of baked salmon sushi. When selecting salmon, opt for high-quality, sustainably sourced fish. The texture of the salmon plays a critical role; it should be tender and flaky once baked, creating a delightful contrast with the seasoned sushi rice.
Nori: This seaweed plays an integral part in traditional sushi making, providing a salty and slightly umami flavor that enhances the overall dish. While baked salmon sushi typically features rice on top of the nori, having a layer of nori still adds a unique texture and flavor that cannot be replaced.
Additional Ingredients: To elevate the dish further, consider adding ingredients such as soy sauce, sesame oil, avocado, cucumber, and furikake. Each of these elements contributes to the overall flavor profile and texture of baked salmon sushi. Soy sauce and sesame oil bring depth and richness, avocado adds creaminess, and cucumber provides a refreshing crunch. Furikake, a Japanese seasoning blend, adds a final touch of umami and texture to the finished product.
The Benefits of Using Fresh Ingredients
Using fresh ingredients is crucial when making baked salmon sushi, not only for the flavor but also for the nutritional advantages they offer.
Nutritional Advantages of Salmon and Vegetables: Salmon is widely recognized for its health benefits, particularly its high omega-3 fatty acid content, which supports heart health and brain function. Incorporating vegetables like avocado and cucumber not only enhances the flavor but also adds essential vitamins and minerals, making this dish a balanced meal option.
Flavor Profiles: Fresh ingredients significantly enhance the dish’s flavor. The natural oils in fresh salmon provide a rich, buttery taste, while ripe avocados contribute a creamy texture. The crispness of cucumber adds a refreshing contrast, and the umami notes from soy sauce and furikake tie everything together beautifully.
The Importance of High-Quality Sushi Rice: Much like the seafood, using high-quality sushi rice is essential for achieving the perfect texture and flavor. The right rice will hold together well, allowing you to form clean rolls that don’t fall apart. High-quality sushi rice also absorbs the seasoning mixture effectively, enhancing the overall flavor of the dish.
Preparing the Sushi Rice
The preparation of sushi rice is a critical step in creating successful baked salmon sushi. Properly cooked and seasoned sushi rice will elevate your dish, making it a standout.
Rinsing and Cooking the Sushi Rice
Why Rinsing is Crucial: Rinsing sushi rice is an essential step that many novice cooks overlook. Rinsing helps remove excess surface starch from the rice grains, which can make the rice gummy and clump together during cooking. By rinsing the rice until the water runs clear, you ensure that the final product is light, fluffy, and perfectly sticky.
Cooking Methods: You can choose between using a rice cooker or cooking the rice on the stovetop. A rice cooker often yields consistent results with minimal effort, while the stovetop method allows for more hands-on control.
For stovetop cooking, follow these steps:
1. Measure out the desired amount of sushi rice (typically one cup serves about two people).
2. Rinse the rice under cold water until the water runs clear.
3. Add the rinsed rice to a pot and combine with the appropriate amount of water (usually a 1:1 ratio).
4. Bring to a boil, then reduce to a simmer, cover, and cook for about 15-20 minutes until the water is absorbed.
Seasoning the Sushi Rice
Once the sushi rice is cooked, it’s time to season it to perfection.
The Importance of Rice Vinegar, Sugar, and Salt: The classic seasoning mixture for sushi rice typically includes rice vinegar, sugar, and salt. This combination adds a subtle sweetness and tanginess that complements the richness of the salmon and other ingredients.
Step-by-Step Guide to Making the Seasoning Mixture:
1. In a small saucepan, combine 1/4 cup rice vinegar, 2 tablespoons sugar, and 1 teaspoon salt.
2. Heat the mixture over low heat, stirring until the sugar and salt are fully dissolved. Do not let it boil; you want to warm it just enough to dissolve the solids.
3. Once dissolved, remove from heat and let cool for a few minutes.
Tips for Achieving the Perfect Texture and Flavor: After the rice has finished cooking, transfer it to a large bowl or a wooden sushi tub (hangiri) if available. While the rice is still hot, gently fold in the seasoning mixture using a wooden spatula or rice paddle. Be careful not to mash the rice; the goal is to coat the grains evenly while maintaining their shape. Allow the seasoned rice to cool to room temperature before assembling your sushi.
Preparing the Baked Salmon
With the sushi rice prepared, it’s time to focus on the salmon, the centerpiece of your baked salmon sushi.
Selecting the Right Salmon
Choosing the right type of salmon is essential for both flavor and sustainability.
Guidelines for Choosing Fresh, Sustainable Salmon: When shopping for salmon, look for fish that is bright in color and has a fresh, clean scent. Avoid any salmon that appears dull or has an off-putting smell. If possible, opt for wild-caught salmon, which is generally considered to have better flavor and is more sustainable than farmed options. If you choose farmed salmon, ensure it comes from a reputable source that practices responsible aquaculture.
Understanding the Differences Between Wild-Caught and Farmed Salmon: Wild-caught salmon tends to be leaner and has a more robust flavor, while farmed salmon is usually fattier, making it richer and more tender. Both options can work well for baked salmon sushi, so choose according to your flavor preference and availability.
Baking the Salmon
Baking the salmon is a straightforward process that enhances its flavor and texture.
Preheating the Oven and Preparing the Baking Sheet: Begin by preheating your oven to 375°F (190°C). While the oven heats, line a baking sheet with parchment paper or lightly grease it to prevent sticking.
Mixing Soy Sauce and Sesame Oil: To enhance the flavor of the salmon, create a simple marinade using soy sauce and sesame oil. This mixture adds depth and richness to the fish, complementing its natural flavors. Combine 2 tablespoons of soy sauce and 1 tablespoon of sesame oil in a small bowl and stir well.
Once your salmon fillet is ready on the baking sheet, drizzle the marinade over the fish, ensuring it is evenly coated. This step not only infuses the salmon with flavor but also helps keep it moist during baking.
Baking Steps
1. Place the prepared salmon in the oven and bake for approximately 12-15 minutes, or until the fish flakes easily with a fork. The cooking time may vary depending on the thickness of the fillet.
2. For added texture and flavor, consider broiling the salmon for the last 2-3 minutes of cooking. This step will give the top a slightly crisp finish and deepen the flavors of the marinade.
As the salmon bakes, the kitchen will fill with an irresistible aroma, setting the stage for the delicious sushi to come. Once you have mastered these initial steps, you will be well on your way to creating a stunning baked salmon sushi that is sure to impress your family and friends. Stay tuned for the next part of this article, where we will dive into assembling your sushi rolls and finalizing the dish!
Baking Time and Temperature Guidelines for Ideal Doneness
To ensure your baked salmon achieves perfect doneness while remaining juicy, it’s essential to monitor both the time and temperature closely. Preheat your oven to 375°F (190°C). Place your seasoned salmon fillets on a baking sheet lined with parchment paper for easy cleanup. Bake the salmon for approximately 15 to 20 minutes, depending on the thickness of the fillets. The general rule is to cook salmon for 4 to 6 minutes per half-inch of thickness.
To check for doneness, look for an internal temperature of 145°F (63°C). The salmon should flake easily with a fork and appear opaque in the center. For an added touch of flavor, consider broiling the salmon for the last 2–3 minutes of cooking for a slightly crispier top.
Assembling the Sushi Rolls
Essential Tools for Assembly
To create beautiful sushi rolls, you’ll need a few essential tools. First and foremost is the bamboo sushi mat, which provides the foundation for rolling. It helps maintain even pressure while rolling, ensuring a tight roll without damaging the ingredients.
Additionally, make sure to have a clean workspace. A clutter-free area allows you to focus on assembling your sushi efficiently. Have a wet cloth handy to clean your hands and the surface as you work, since sticky rice can create a mess.
Layering the Ingredients
Now it’s time to layer your sushi. Begin by placing a sheet of nori on your bamboo mat, shiny side down. Wet your hands with water to prevent the rice from sticking. Take about a cup of sushi rice, and spread it evenly over the nori, leaving about an inch at the top edge for sealing later. Use your fingers to press the rice gently, ensuring it adheres well without mashing it.
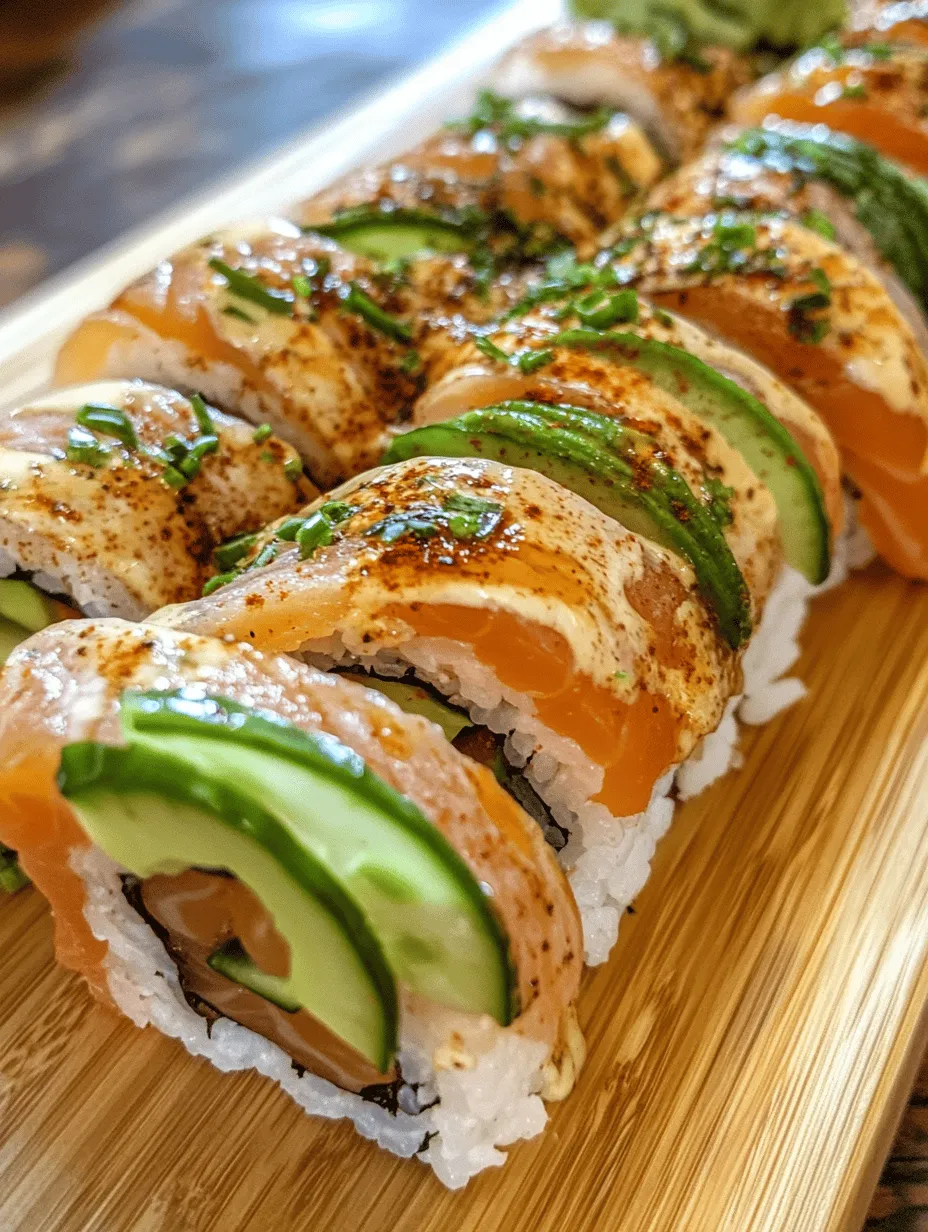
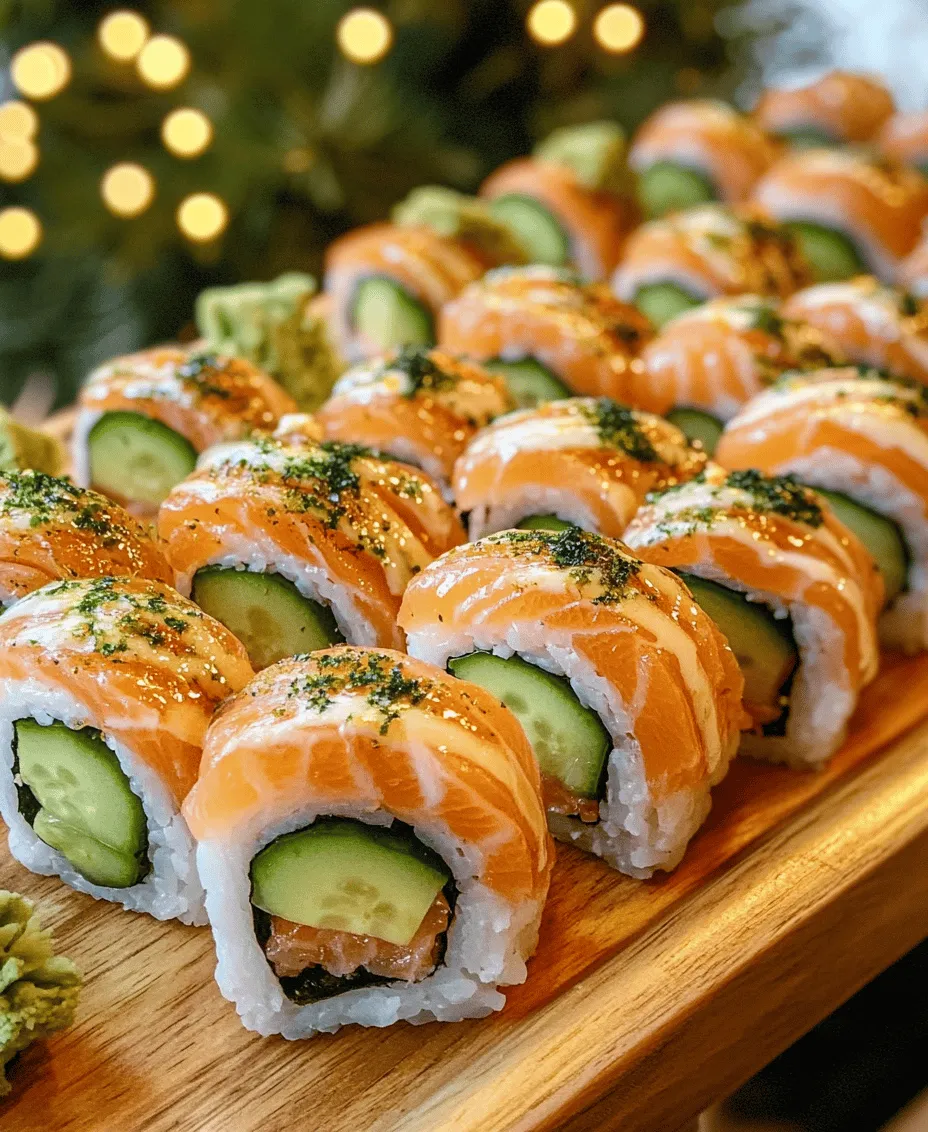
Next, add your flaked baked salmon, followed by thin slices of avocado and cucumber. The creamy avocado and crunchy cucumber will provide a perfect contrast to the tender salmon, enhancing the overall flavor profile. To achieve a balanced flavor in each roll, ensure that you distribute the ingredients evenly across the rice.
Rolling Techniques: Achieving the Perfect Sushi Roll
Rolling sushi may seem daunting at first, but with a little practice, you’ll become a pro. Start at the end of the mat closest to you and lift it to start rolling over the ingredients. Use your fingers to keep the filling in place and apply gentle pressure as you roll away from yourself. The goal is to create a tight roll while keeping the ingredients intact.
Common mistakes to avoid include overfilling the roll, which can cause it to burst during rolling, and not applying enough pressure, which can lead to a loose roll. Once you’ve rolled the sushi, use your bamboo mat to shape it by applying more pressure gently.
To seal the edges effectively, moisten the top edge of the nori with a bit of water. Press the roll firmly to ensure it stays closed. You can also use a bit of rice to help seal any gaps.
Slicing and Presenting the Sushi
Techniques for Slicing Sushi Rolls
Before serving your sushi, it must be sliced properly. A sharp knife is crucial for clean cuts that preserve the integrity of each roll. To prevent the rice from sticking to the knife, dip it in water before each cut. Aim for slices about 1 inch thick. This thickness allows for an appealing presentation while ensuring each piece retains the flavors of all the fillings.
Creative Presentation Ideas
Presentation plays a key role in the overall sushi experience. Arrange your sushi rolls on a large platter, making sure they’re spaced out to highlight each piece. For a touch of flair, garnish with wasabi and pickled ginger on the side. These traditional accompaniments not only enhance flavor but also add a pop of color to your presentation.
For serving suggestions, consider pairing your sushi with a small bowl of soy sauce for dipping. You can also offer a side of edamame or a simple seaweed salad to round out the meal. If you’re feeling adventurous, complement your sushi with a light, chilled sake or a refreshing green tea.
Nutritional Information of Baked Salmon Sushi
Baked salmon sushi is not only delicious but also packed with nutritional benefits. Here’s a brief overview of what you can expect:
– Caloric Breakdown: Each serving of sushi (approximately 2–3 rolls) contains around 300-400 calories, depending on the amount of rice and fillings used. This makes it a satisfying yet light meal option.
– Key Vitamins and Minerals: Salmon is a fantastic source of essential nutrients, including vitamin D, selenium, and B vitamins. The avocado adds healthy fats and fiber, while cucumber contributes hydration and additional vitamins.
– Health Benefits of Omega-3 Fatty Acids: One of the standout features of salmon is its high omega-3 fatty acid content, known for promoting heart health, reducing inflammation, and supporting cognitive function.
Conclusion: Enjoying Your Homemade Baked Salmon Sushi
Creating baked salmon sushi at home is not just about the delicious flavors; it’s also a rewarding culinary project that can bring family and friends together. The process of rolling sushi can be a fun activity, encouraging teamwork in the kitchen. By mastering the techniques outlined above, you can elevate your sushi-making skills and impress your loved ones with this sophisticated dish.
Celebrate the fresh ingredients and the joy of crafting your own sushi rolls. Whether you enjoy your baked salmon sushi as a casual meal or an impressive appetizer at a gathering, each bite will reflect the love and effort put into it. So, gather your ingredients, invite some friends, and embark on this sushi-making adventure – deliciousness awaits!
Baked Salmon Sushi
Ingredients