

Introduction
Oreo Delight Balls are a delightful fusion of creamy and crunchy textures, perfect for satisfying your sweet tooth. These no-bake treats are not only simple to prepare but also an indulgent dessert that brings joy to any gathering. The combination of Oreo cookies and cream cheese creates a rich and flavorful filling, while the chocolate coating provides a luxurious touch. In this article, we explore everything you need to know to make these delicious dessert bites at home.
The enchantment of Oreo Delight Balls lies in their versatile nature—they fit seamlessly into various occasions, from birthday parties to holiday celebrations. Their bite-sized format makes them ideal for serving at gatherings, allowing guests to enjoy these treats without the need for utensils. As they require minimal preparation and can be made ahead of time, they are the quintessential dessert for anyone looking to impress their family and friends without the fuss of elaborate baking.
Imagine the pleasure of biting into these sweet morsels where the crunchy chocolate cookie mingles with tangy cream cheese, all enveloped in a luscious chocolate coating. Each ball bursts with flavor and visual appeal, especially when topped with colorful sprinkles or a dusting of crushed Oreos. The result is not only a delectable dessert but also a feast for the eyes that leaves everyone asking for more.
Recipe Overview
– Prep Time: 15 minutes
– Cook Time: 10 minutes
– Total Time: 1 hour
– Course: Dessert
– Cuisine: American
– Servings: Makes about 24 balls
– Calories: Approximately 150 per ball
Ingredients
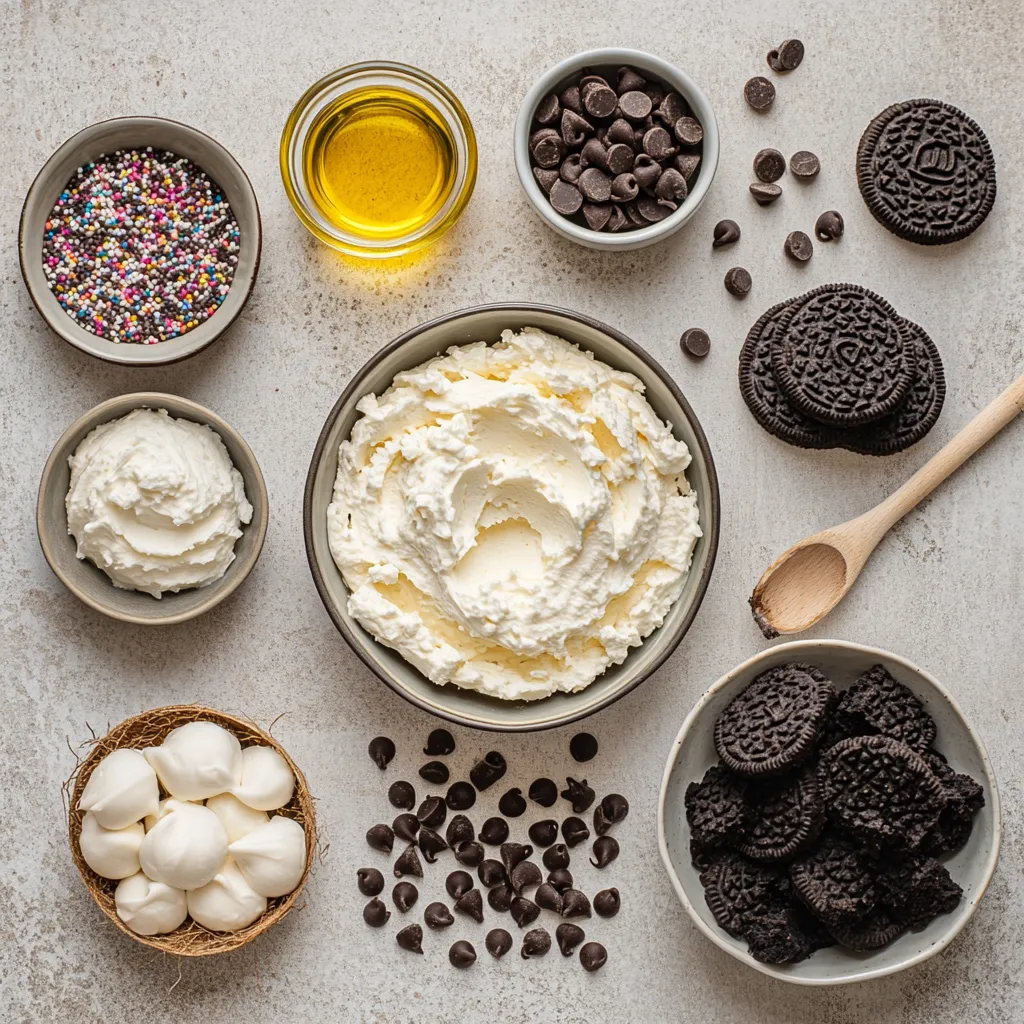
– 1 package of Oreo cookies (approximately 36 cookies)
– 8 oz cream cheese, softened to room temperature
– 1 cup chocolate chips (choose between milk or dark chocolate)
– 1 tablespoon coconut oil (optional, for a smoother chocolate coating)
– Sprinkles or crushed Oreo crumbs for garnish (optional)
Instructions
1. Begin by crushing the Oreo cookies into fine crumbs. You can do this using a food processor for a quick method or by placing the cookies in a zip-top bag and rolling over them with a rolling pin until finely crushed.
2. In a spacious mixing bowl, combine the crushed Oreo crumbs with the softened cream cheese. Mix thoroughly until the ingredients are well blended and a cohesive dough forms.
3. Using your hands, take small portions of the mixture and roll them into balls, each about 1 inch in diameter. Arrange the formed balls on a baking sheet lined with parchment paper.
4. Place the baking sheet in the freezer and chill the Oreo balls for approximately 30 minutes, or until they are firm to the touch.
5. While the Oreo balls are chilling, prepare the chocolate coating. In a microwave-safe bowl, combine the chocolate chips and coconut oil (if using). Heat in the microwave in 30-second intervals, stirring in between until the mixture is completely melted and smooth.
6. Once the Oreo balls are firm, take each one and dip it into the melted chocolate, ensuring they are completely coated. Gently shake off any excess chocolate before placing them back onto the lined baking sheet.
7. Before the chocolate coating sets, add a festive touch by sprinkling the tops with colorful sprinkles or extra crushed Oreo crumbs, if desired.
8. Transfer the baking sheet back to the refrigerator and let the Oreo balls chill for at least 30 minutes, allowing the chocolate to harden completely.
9. Once set, serve the Oreo Delight Balls chilled and savor the delightful flavors!
Description of the Dish
Oreo Delight Balls are bite-sized desserts made with a base of crushed Oreo cookies and cream cheese, coated in melted chocolate, and garnished for visual allure. The contrast of crunchy, silky, and smooth textures creates a multi-dimensional eating experience that is both nostalgic and satisfying.
Nutritional Information
– Total Calories: Approximately 150 per ball
– Servings: Makes about 24 balls
Timing Breakdown
– Prep Time: 15 minutes
– Cook Time: 10 minutes
– Total Time: 1 hour
Course and Cuisine
– Course: Dessert
– Cuisine: American
Creating Oreo Delight Balls not only satisfies your cravings for sweets but also provides an opportunity to showcase culinary creativity in the kitchen. These mini delights can easily become a staple in your dessert repertoire, pleasing both children and adults alike.
Equipment Needed
To ensure a smooth preparation process, the following equipment is recommended:
– Food processor: This handy tool will help you crush the Oreo cookies quickly, though if you don’t have one, a zip-top bag and a rolling pin will also do the trick.
– Mixing bowl: Essential for combining the cream cheese with the cookie crumbs thoroughly.
– Baking sheet: The ideal surface for arranging your formed balls before chilling.
– Parchment paper: This will keep the Oreo balls from sticking to the baking sheet, making it easy to remove them once they’re set.
– Microwave-safe bowl: Required for melting the chocolate chips effectively without burning them.
Preparation Steps
Crushing the Oreo Cookies
The first step in preparing these delightful treats is to transform the Oreo cookies into fine crumbs. If you have a food processor, this process will be quick and efficient. Simply add the cookies to the processor and pulse until they reach a fine crumb consistency. If you’re going the manual route, take a zip-top bag, add the cookies, seal it, and then use a rolling pin to crush the cookies evenly. This method might take a bit longer, but it’s a great way to get a workout while you bake!
Mixing Ingredients
Once your cookies are finely crushed, it’s time to mix them with the softened cream cheese. This step is crucial as the cream cheese acts as a binding agent, bringing the cookies together into a cohesive dough. Using a spacious mixing bowl, combine the crushed Oreo crumbs with the cream cheese and mix thoroughly until the ingredients are well incorporated, and a smooth and uniform dough forms. The goal here is to achieve a mixture that holds together well—ideal for rolling into balls.
Forming the Balls
With your dough ready, the next step involves portioning it out and shaping it into balls. It is advisable to use your hands to take small amounts of the mixture and roll them into balls, approximately 1 inch in diameter. This size is perfect for a bite-sized dessert that packs a punch of flavor while still being easy to eat. Once you have rolled out all the balls, arrange them neatly on your lined baking sheet.
Chilling Period
The formed Oreo balls now need to chill for about 30 minutes. This chilling period is essential, as it allows them to firm up, making them easier to dip into the melted chocolate later. Use this waiting time to prepare your chocolate coating, ensuring that your treats are perfectly coated once they are set.
Oreo Delight Balls provide an irresistible combination of flavors and textures. As we transition into the next part of the process, the creation of the chocolate coating will elevate these delightful treats to their delectable peak.
Melting the Chocolate
To create a luxurious chocolate coating that adds to the allure of the Oreo Delight Balls, careful attention must be paid to melting the chocolate. Here’s a step-by-step guide on how to do it safely and effectively.
Step-by-Step Guide to Melting Chocolate Safely in the Microwave
1. Gather Your Supplies: Start by ensuring you have a microwave-safe bowl ready, along with your chocolate chips and coconut oil if you choose to use it.
2. Measure and Combine: Pour the appropriate amount of chocolate chips into the bowl. If you’re using coconut oil, add 1 tablespoon to the chocolate.
3. Microwave in Intervals: Place the bowl in the microwave. Set the timer for 30 seconds, and let it melt. After 30 seconds, remove the bowl and stir.
4. Repeat Until Smooth: Continue microwaving in 15-30 second bursts, stirring after each interval until the chocolate is completely melted and smooth. This will prevent the chocolate from scorching.
Tips for Stirring and Achieving a Smooth Consistency
– Use a Silicone Spatula or Wooden Spoon: These tools help eliminate lumps and mix the melted chocolate efficiently.
– Be Gentle: Stir slowly to avoid introducing too much air and causing the chocolate to seize or become grainy.
Dipping the Oreo Balls
Perfectly coating your chilled Oreo balls in melted chocolate is essential for an elegant finish. Follow these techniques to achieve a professional touch.
Techniques for Evenly Coating Each Ball in Chocolate
1. Use a Fork or Dipping Tool: This makes it easier to balance the ball and dip it in chocolate without making a mess.
2. Rotate for an Even Coating: Gently submerge the Oreo ball into the melted chocolate, using the fork to rotate it until it is fully covered.
3. Tip Off Excess Chocolate: Allow the chocolate-coated ball to rest on the fork for a moment to let excess chocolate drip off.
Advice on Shaking Off Excess Chocolate for a Clean Finish
– Tap the Fork: Lightly tapping the fork against the bowl will help remove any pools of chocolate and create a cleaner coating.
– Don’t Overcoat: Aim for a thin layer that maintains the round shape of the ball while showcasing the texture beneath.
Adding Finishing Touches
Once the Oreo balls are dipped, adding your decorative elements will enhance their appeal before the chocolate hardens.
Suggestions for Decoration with Sprinkles or Crushed Oreo Crumbs
– Apply Before Setting: After dipping each ball, sprinkle immediately with your chosen toppings while the chocolate is still wet.
– Be Creative: Use a mix of colorful sprinkles or different flavors of crushed Oreos for a fun and vibrant presentation.
Ideas for Enhancing Visual Appeal Before the Coating Sets
– Use Contrasting Colors: Bright colored sprinkles against dark chocolate create a striking visual effect.
– Cocoa Dusting: Consider lightly dousing some balls in cocoa powder or powdered sugar for a gourmet touch.
Setting the Coating
The chilling process is crucial for achieving the right texture in your chocolate-coated Oreo balls.
Refrigeration Time
Chilling the chocolate-coated Oreo balls for at least 30 minutes is recommended to ensure the chocolate hardens correctly. This step is vital for both texture and presentation, allowing the coating to form a nice crisp shell.
Importance of Storing in the Refrigerator to Maintain Freshness
To maintain the indulgent taste and texture of your Oreo Delight Balls, keep them refrigerated until ready to serve. This not only keeps the chocolate from melting but also preserves the freshness of the cream cheese filling.
Presentation Tips
A beautiful presentation can elevate your Oreo Delight Balls from simple bites to a show-stopping dessert among guests.
Plating Suggestions
– Decorative Platters: Arrange the chocolate-coated balls meticulously on a vibrant platter. A white plate can really amplify the colors of your sprinkles and chocolate.
– Cupcake Liners: Placing each ball in colorful cupcake liners can create an attractive display and make serving easier.
Drizzling Chocolate and Garnishes
To add an extra special touch, consider these techniques:
– Drizzling Extra Chocolate: After the first layer of chocolate has set, melt more chocolate and use a spoon or a piping bag to drizzle it over the balls for added sophistication.
– Additional Garnishes: Consider additional elements such as crushed nuts, edible glitter, or mini chocolate chips sprinkled on top after drizzling.
Flavor Combinations
Experimenting with flavor can bring a fresh twist to your Oreo Delight Balls, making them versatile for various palates.
Using Different Cookie Flavors
While classic Oreos are beloved, trying out other flavored Oreos can yield delightful results. Think golden Oreos, mint, or peanut butter versions to make new flavor profiles.
Customizing Chocolate Coatings
Explore alternative chocolate coatings instead of the traditional milk or dark chocolate. Options like white chocolate, caramel drizzle, or flavored chocolates like mint or raspberry can offer indulgence with a unique taste.
Storage Solutions
To ensure that your Oreo Delight Balls remain fresh and delicious, here are some best practices for storage.
Refrigeration
When stored properly in an airtight container, Oreo Delight Balls will stay fresh in the refrigerator for up to one week. This is essential to keep the cream cheese filling from spoiling while maintaining the chocolate coating’s integrity.
Freezing Options
If you wish to extend the lifespan of your treats, consider freezing them. Place them in a single layer in a freezer-safe container or see-through zip-top bag. When you’re ready to enjoy, allow them to thaw in the refrigerator for optimal quality.
Occasions for Serving
The versatility of Oreo Delight Balls makes them suitable for a wide range of events and occasions.
Celebratory Events
Oreo Delight Balls make a delightful addition to celebratory events such as birthdays, holidays, and family gatherings. Their bite-sized nature encourages sharing and adds a festive atmosphere.
Everyday Treats
These decadent treats aren’t just for special occasions. They can also serve as an everyday snack or a sweet pick-me-up during the week.
Conclusion
Oreo Delight Balls are a simple yet delightful dessert, blending rich flavors with an eye-catching appearance. Their versatility and ease of preparation make them a fantastic option for both celebrations and casual snacks. Enjoy the delicious experience they provide!

Easy No-Bake Oreo Delight Balls Recipe
Ingredients
- 1 package Oreo cookies
- 8 oz cream cheese
- 1 cup chocolate chips
- 1 tablespoon coconut oil
- to taste sprinkles or crushed Oreo crumbs
Instructions
- Crush the Oreo cookies into fine crumbs using a food processor or rolling pin.
- Combine the crushed Oreo crumbs with softened cream cheese in a mixing bowl and mix until well blended.
- Roll small portions of the mixture into balls, about 1 inch in diameter, and place on a lined baking sheet.
- Chill the Oreo balls in the freezer for about 30 minutes until firm.
- Melt chocolate chips and coconut oil in a microwave-safe bowl, stirring until smooth.
- Dip each chilled Oreo ball into the melted chocolate, ensuring they are fully coated.
- Shake off excess chocolate and return the coated balls to the lined baking sheet.
- Sprinkle with colorful sprinkles or crushed Oreo crumbs before the chocolate sets.
- Refrigerate for at least 30 minutes to allow the chocolate to harden.
- Serve chilled and enjoy the delightful flavors!