

Introduction
The holiday season beckons with the joys of baking, and what better way to celebrate than with Festive Candy Cane Delight Cookies? These vibrant cookies combine delightful flavors of peppermint and vanilla with a visually striking presentation that captures the spirit of the season. The vibrant reds and greens swirl together in a delightful way that not only pleases the eye but also evokes the warmth and cheer of holiday celebrations. Perfect for holiday parties, cozy family gatherings, or as homemade gifts, these cookies are a delicious embodiment of holiday cheer that everyone can appreciate.
The taste of these cookies is a harmonious blend of rich butter, sweet vanilla, and the unmistakable zing of peppermint, making each bite a delightful experience. As they bake, the aroma wafts through the house, inviting family and friends to indulge in a sweet treat. With their unique peppermint candy cane decoration and festive colors, these cookies are sure to be a hit amongst guests of all ages, bringing a delightful holiday touch to your cookie platter.
Recipe Overview
Festive Candy Cane Delight Cookies are not only visually appealing but also surprisingly easy to prepare. This recipe provides all the elements needed for perfect cookies: a wonderfully balanced flavor profile, vibrant color, and a delightful crunch from the crushed candy canes. Below is a summarized snapshot of what to expect from this festive recipe:
– Total Time: 40 minutes
– Prep Time: 20 minutes
– Servings: Approximately 24 cookies
– Difficulty: Not specified in the recipe
Ingredients
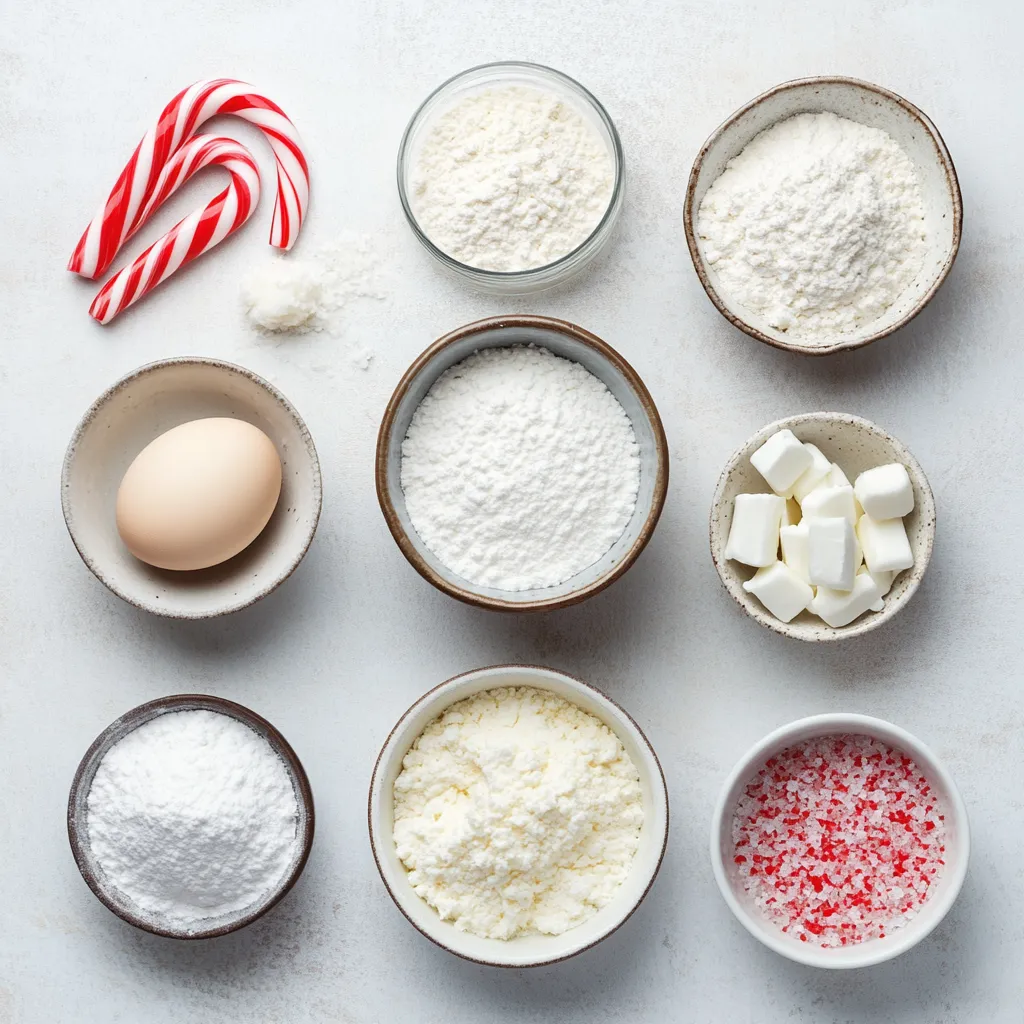
Creating the perfect batch of Festive Candy Cane Delight Cookies involves the following ingredients, each contributing to the sweet, festive flavor and delightful texture of the cookies:
– 2 ¾ cups all-purpose flour
– 1 teaspoon baking powder
– ½ teaspoon salt
– 1 cup unsalted butter, softened to room temperature
– 1 cup granulated sugar
– 1 large egg
– 1 teaspoon vanilla extract
– ½ teaspoon peppermint extract
– ½ cup crushed candy canes (plus extra for garnish)
– Red and green food coloring (gel or liquid)
All-Purpose Flour
All-purpose flour is essential for providing structure to cookies. It interacts with the leavening agents to create the desired texture and rise. The gluten formed during mixing helps to bind the ingredients together, giving the cookies their distinctive chewiness.
Baking Powder and Salt
Baking powder serves as a leavening agent, helping the cookies rise and creating a light texture. Salt enhances the flavors in sweet treats, balancing the sweetness and bringing out the other flavors in the dough.
Butter
Unsalted butter is preferred in cookie recipes for better control over the salt content. Softened butter at room temperature is vital for creaming with sugar, which aerates the mixture and adds to the cookie’s tenderness.
Granulated Sugar
Granulated sugar not only adds sweetness but also contributes to the texture of the cookies. During the creaming process, sugar helps to incorporate air into the dough, resulting in a fluffier cookie.
Egg
The large egg acts as a binding agent, bringing the ingredients together while providing moisture to the dough. It also contributes to the cookie’s overall structure and texture, leading to a softer, chewy bite.
Flavor Extracts
Vanilla and peppermint extracts are central to the cookie’s overall flavor profile. They enhance the sweetness while introducing a refreshing minty character that is synonymous with holiday treats.
Crushed Candy Canes
Crushed candy canes add a delightful crunch and a burst of peppermint flavor. They also serve as visual appeal, embodying the spirit of the holiday season. Finding crushed candy canes is generally easy during the holiday season, or you can crush them yourself.
Food Coloring
The addition of red and green food coloring elevates the visual presentation of the cookies, making them festive and appealing for holiday gatherings. Both gel and liquid food coloring can be used, with gel offering a more vibrant hue.
Instructions
The process of creating Festive Candy Cane Delight Cookies is straightforward and enjoyable. Here’s how to bring these delightful cookies to life:
1. Preheat the Oven: Begin by preheating your oven to 350°F (175°C). Prepare two baking sheets by lining them with parchment paper to prevent sticking. This step ensures that the cookies bake evenly and release easily after baking.
2. Mix Dry Ingredients: In a medium-sized bowl, combine the flour, baking powder, and salt. Whisk them together thoroughly to ensure even distribution of the leavening agents. Setting this mixture aside for now is vital as it will be combined with the wet ingredients later.
3. Cream Butter and Sugar: In a large mixing bowl, use an electric mixer to beat the softened butter and granulated sugar together on medium speed. Continue mixing for about 2-3 minutes, or until the mixture becomes light, fluffy, and pale in color. Proper creaming is crucial, as it introduces air into the mixture.
4. Incorporate Egg and Extracts: Add the large egg, along with the vanilla and peppermint extracts, to the butter-sugar mixture. Beat everything together until fully combined and smooth. This ensures that the flavors meld beautifully.
5. Combine Mixtures: Slowly add the dry ingredient mixture to the wet ingredients, mixing on low speed until just combined. Exercise caution not to overmix, as this can affect the texture of your cookies. The dough should be mixed just until no streaks of flour remain.
6. Divide the Dough: Carefully divide the dough into two equal portions. To one half, add a few drops of red food coloring, mixing until you achieve a vibrant red hue. To the other half, add green food coloring, ensuring it is well incorporated for an even color throughout.
7. Shape the Cookies: Take small pieces of each colored dough, approximately one tablespoon each, and roll them into ropes about 6 inches long. Twist one red and one green rope together to create a beautiful candy cane shape on the prepared baking sheet.
8. Add Candy Cane Crumbles: Before placing the cookies in the oven, generously sprinkle a small amount of crushed candy canes on top of each cookie for an extra festive flavor and delightful crunch.
9. Bake the Cookies: Place the baking sheets into the preheated oven and bake for 10-12 minutes. The cookies are done when the edges are lightly golden. Allow them to cool on the baking sheets for a few minutes before transferring them to a wire rack to cool completely.
10. Final Touch: Once the cookies have cooled, feel free to sprinkle additional crushed candy canes on top for an even more festive presentation.
Preparing the Dough
The preparation of the dough is a crucial step that can determine the success of the cookies. Each phase in the process is designed to ensure that the flavors meld appropriately while achieving the desired texture.
Preheating the Oven
Preheating your oven is a vital first step in cookie baking. An oven at the right temperature will provide the even heat necessary for cookies to bake adequately without burning. Line your baking sheets with parchment paper to create a non-stick surface; this eases the transfer of hot cookies from sheet to wire rack.
Mixing Dry Ingredients
Whisking the dry ingredients together helps to aerate them and prevents clumping, which is essential for an even texture in the final cookies. Ensure that the baking powder and salt are evenly distributed throughout the flour, as this ensures consistency in rising and taste.
Creaming the Butter and Sugar
Achieving the right texture during the creaming stage is essential. Beat the combination of softened butter and sugar until fluffy, looking for a pale and light consistency. This step incorporates air into the mix, which contributes to the cookie’s lightness, leading to a delightful bite. Watch for visual cues indicating that the butter-sugar mixture is ready for the next ingredients.
Incorporating Egg and Extracts
Adding the egg and extracts requires careful mixing to ensure that they are entirely and uniformly distributed within the dough. This guarantees that each cookie delivers the same flavor profile. The combination of vanilla and peppermint creates a quintessentially festive flavor.
Combining Wet and Dry Mixtures
When combining the wet and dry mixtures, doing this at low speed is key to maintaining the cookie’s texture. Overmixing can lead to tougher cookies as gluten forms in the flour. Stop mixing as soon as the flour is incorporated to ensure a softer texture, which is ideal for cookies.
Dividing and Coloring the Dough
Properly dividing and coloring the dough is where the festive character of these cookies truly shines.
Techniques for Dividing Dough
When dividing the dough, use a knife or dough scraper to cut it neatly into two equal portions. This will help maintain balance in the flavors and colors of the cookies. Make sure to work with cold or slightly chilled dough if possible, as this makes it easier to handle and shape.
Adding Food Coloring
To create vibrant colors, add the food coloring carefully, a few drops at a time. Mixing should be done until the colors are evenly blended throughout the dough. Using gel food coloring can yield a more intense color, while liquid food coloring provides a softer hue. Take care to ensure the colors are well incorporated, creating a festive swirl for the candy cane appearance.
With these steps, you will have a solid foundation for making delightful, festive cookies that will surely become a favorite during the holiday season. Part 2 will further elaborate on the final baking and presentation techniques to complete your baking endeavor.
How to achieve vibrant hues
When preparing your Festive Candy Cane Delight Cookies, achieving vibrant hues through food coloring can enhance both the aesthetics and festive spirit of your baked goods. Here are some techniques to ensure your colors pop.
Utilize Gel vs. Liquid Food Coloring
Using gel food coloring is a preferred technique for this recipe because it offers richer colors and requires smaller quantities compared to liquid food coloring. Gel coloring can provide the desired hue without altering the dough’s moisture content. If liquid food coloring is your only option, be mindful to start with very small amounts, as it can easily make the dough too wet.
Mixing Thoroughly for an Even Finish
To attain a consistent color throughout your dough, knead or mix thoroughly, ensuring all parts of the dough are completely colored. When adding color, start with one or two drops and gradually add more until you reach the desired intensity. For an eye-catching effect, do not hesitate to create marbled dough by gently swirling colors together without fully mixing them.
Shaping the Cookies
The technique of shaping the cookies into festive candy canes not only adds visual appeal but also creates a fun baking experience.
Rolling the Dough into Ropes
Tips for Consistent Sizing
For uniform cookie sizes, it’s advisable to weigh out each piece of dough. Each piece should be roughly one tablespoon in size. If you want precision, using a small kitchen scale can help. Alternatively, dividing the dough first ensures you have enough for consistent segments.
Techniques to Prevent Sticking
To prevent the dough from sticking to your hands or the work surface, lightly dust your hands and the surface with flour. If the dough becomes too soft or is difficult to work with, refrigerating it for about 10-15 minutes can help firm it up, making the rolling process much easier.
Twisting and Creating Shapes
Steps to Twisting the Dough Ropes Effectively
Once you have the red and green ropes, place them side by side and gently twist them together, starting from the top down. To ensure they maintain their shape, work with a gentle hand to avoid tearing the dough. Use a smooth motion to create a spiral effect, then bend the top to form the hook of the candy cane.
Alternative Shapes for Creativity
While the candy cane shape is traditional, you can experiment with other designs such as wreaths, stars, or simple rounded cookies. To create a wreath, simply form the dough into circles and decorate with candy cane crumbles as usual. For stars, flatten the dough and use a star-shaped cutter before adding the crushed candy canes.
Garnishing the Cookies
The final touch of garnishing elevates these cookies from delightful to spectacular.
Adding Candy Cane Crumbles
Timing for Adding Crumbles
The best time to add crushed candy cane crumbles is just before baking. This allows the crumbles to adhere well to the cookies without burning in the oven. Be sure to sprinkle them generously to enhance both the flavor and the visual appeal.
Techniques to Ensure They Stick
To ensure the crumbles stick properly, lightly press them into the dough after sprinkling. This ensures that they will become part of the cookie instead of falling off after baking.
Optional Presentation Enhancements
Creative Ideas for Additional Garnishes
While crushed candy canes provide a classic touch, consider adding drizzles of white or dark chocolate on top for a luxurious finish. For added sparkle, edible glitter can be sprinkled right before serving.
How to Arrange Cookies for Maximum Visual Impact
When presenting your cookies, consider using a festive platter or tiered stand to display them artistically. Arrange cookies in a circular pattern or in height to draw attention. Include whole candy canes and sprigs of mint for a complete seasonal look.
Baking the Cookies
An understanding of the baking process can significantly affect your cookies’ outcomes.
Setting Up the Oven
Tips for Even Baking
For optimal results, always preheat your oven fully before placing cookies inside. To enhance airflow and ensure that your cookies bake evenly, position baking sheets in the center of the oven. If baking multiple trays, rotate them midway through the baking process.
Managing Bake Times Based on Oven Variances
Consider that different ovens can vary significantly in terms of heat distribution. Keep an eye on your cookies during the last few minutes of baking to avoid over-browning. Check your cookies for doneness at around the 10-minute mark, and adjust based on your oven’s performance.
Recognizing Doneness
Signs to Look for in Baked Cookies
Cookies are typically done when the edges are faintly golden, but the centers may still appear slightly soft. This is a sign that they will continue to set as they cool. Overbaking can lead to a dry texture, so err on the side of caution.
Importance of Cooling on Wire Racks
Transferring cookies immediately to wire racks right after baking is crucial. It promotes air circulation and prevents sogginess, allowing the cookies to maintain their delightful texture.
Cooling and Storing Cookies
Proper cooling and storage techniques keep your cookies fresh and delicious.
Cooling Techniques
Best Practices for Transferring Cookies
Using a spatula is key when transferring cookies from the baking sheet to the rack. Gently slide it under each cookie and lift it carefully to avoid breaking the delicate shapes.
Importance of Wire Racks for Cooling
Wire racks allow heat to dissipate evenly from all sides of the cookies, helping maintain their texture and preventing them from stewing in residual heat.
Storage Suggestions
How to Keep Cookies Fresh for Longer
After ensuring the cookies are completely cool, store them in an airtight container to keep them soft and fresh. Placing parchment paper between layers can prevent them from sticking to one another.
Recommendations for Freezing Cookies
If you need to store cookies for an extended period, consider freezing them. Place them in a single layer on a baking sheet in the freezer until solid before transferring them to a zip-top bag or airtight container. Frozen cookies maintain their quality for up to three months. When ready to enjoy, allow them to thaw at room temperature.
Healthier Variations
Exploring how to modify the recipe for a healthier approach without sacrificing flavor.
Alternative Sweeteners
Using natural sweeteners like honey or agave can offer a healthier twist. Keep in mind that these options may add moisture, requiring adjustments to the overall liquid content in the recipe.
Effects on Flavor and Baking
Substituting sweeteners can impact both flavor and texture, so testing small batches will help you find the right balance without compromising the delightful candy cane essence.
Gluten-Free Options
Suggestions for Flour Substitutes
If you’re looking to make gluten-free cookies, replacing all-purpose flour with a 1:1 gluten-free flour blend can yield satisfactory results.
Adjustments Needed for Texture and Flavor Balance
Keep an eye on the dough’s texture; gluten-free flours may require additional binding agents like xanthan gum or an extra egg to achieve the chewy texture that these cookies are known for.
Serving Suggestions
Different delightful ways to serve and enjoy these festive cookies.
Pairing with Beverages
Ideal Drinks to Accompany Candy Cane Cookies
To complement the minty flavors of these cookies, consider serving them with holiday drinks like hot cocoa, peppermint mocha, or even a warm spiced cider. The pairing will enhance the seasonal spirit of your gathering.
Creative Serving Display Tips
Creating visually appealing presentations can elevate any cookie platter. Mixing in different colored layers or adding leafy greens as a garnish can bring a refreshing touch to your holiday table setup.
Themed Platters for Festive Gatherings
Utilize platters that reflect the holiday spirit, such as ones with snowflake designs or vibrant reds and greens. Pairing your cookies with other festive treats will create a charming buffet-style arrangement.
Gift-Wrapping Ideas
Ideas for Gifting Cookies
These delightful cookies are perfect for gifting. Placing them in a decorative tin or box lined with colorful tissue paper adds a personal touch for anyone on your list.
Packaging Tips to Keep Them Fresh
To keep cookies fresh while being transported, consider wrapping them in plastic wrap and then placing them in a box with a secure lid or a resealable bag. It protects them from breaking while maintaining their lovely texture.
Conclusion
Festive Candy Cane Delight Cookies are a beautiful and festive treat that balances sweetness with a refreshing minty flavor. The vibrant colors and soft texture, combined with a straightforward preparation time of just 40 minutes, make them an appealing choice for holiday gatherings. Their cheerful appearance not only delights anyone who sees them, but they are also a fun baking project to involve family and friends during the festive season.

Festive Candy Cane Delight Cookies
Ingredients
- 2 ¾ cups all-purpose flour
- 1 teaspoon baking powder
- ½ teaspoon salt
- 1 cup unsalted butter softened
- 1 cup granulated sugar
- 1 large egg
- 1 teaspoon vanilla extract
- ½ teaspoon peppermint extract
- ½ cup crushed candy canes
- red and green food coloring
Instructions
-
Preheat the oven to 350°F (175°C) and line two baking sheets with parchment paper.
-
In a bowl, whisk together flour, baking powder, and salt; set aside.
-
Beat softened butter and sugar in a large bowl until light and fluffy.
-
Add egg, vanilla, and peppermint extracts; mix until smooth.
-
Gradually add dry ingredients to wet ingredients, mixing until just combined.
-
Divide dough in half; color one half red and the other green.
-
Roll small pieces of each color into 6-inch ropes and twist them together.
-
Sprinkle crushed candy canes on top of each cookie before baking.
-
Bake for 10-12 minutes until edges are lightly golden; cool on wire rack.
-
Sprinkle additional crushed candy canes on cooled cookies for garnish.