

Introduction
Explore the delightful world of homemade snacks with these Nutty Chocolate Bliss Balls. A perfect combination of flavors and textures, these bite-sized treats are both satisfying and easy to prepare. Ideal for those who appreciate the goodness of natural ingredients, this recipe inspires creativity while adhering to dietary preferences, making it a versatile option for any snack occasion. With a perfect blend of nuttiness from peanut butter and sweetness from honey, these bliss balls are a delicious way to curb cravings without compromising on nutrition.
Imagine serving these blissful bites at your next gathering—a hit among both kids and adults alike. Packed with protein and healthy fats, they not only offer an energy boost but also double as a delightful treat for any time of day, be it a midday snack, post-workout boost, or a sweet indulgence during movie nights.
Recipe Overview
– Prep Time: 10 minutes
– Cook Time: Not specified in the recipe
– Total Time: 1 hour (plus chilling)
– Course: Snack
– Cuisine: American
– Servings: 12
– Calories: Approximately 150 per ball
These Nutty Chocolate Bliss Balls are a wholesome snack option that combines peanut butter, oats, and sweeteners into a delightful ball of joy. With a rich texture and a hint of chocolate, they cater to both kids and adults alike. Their quick preparation time makes them a go-to choice for busy schedules or a last-minute treat.
Snack Characteristics
– Easy to make and perfect for gatherings or meal prep
– Rich in protein and healthy fats from peanut butter
– Naturally sweetened for a satisfying taste
Serve and Store
– Great for sharing at parties or as a quick snack at home
– Can be stored in an airtight container for up to a week
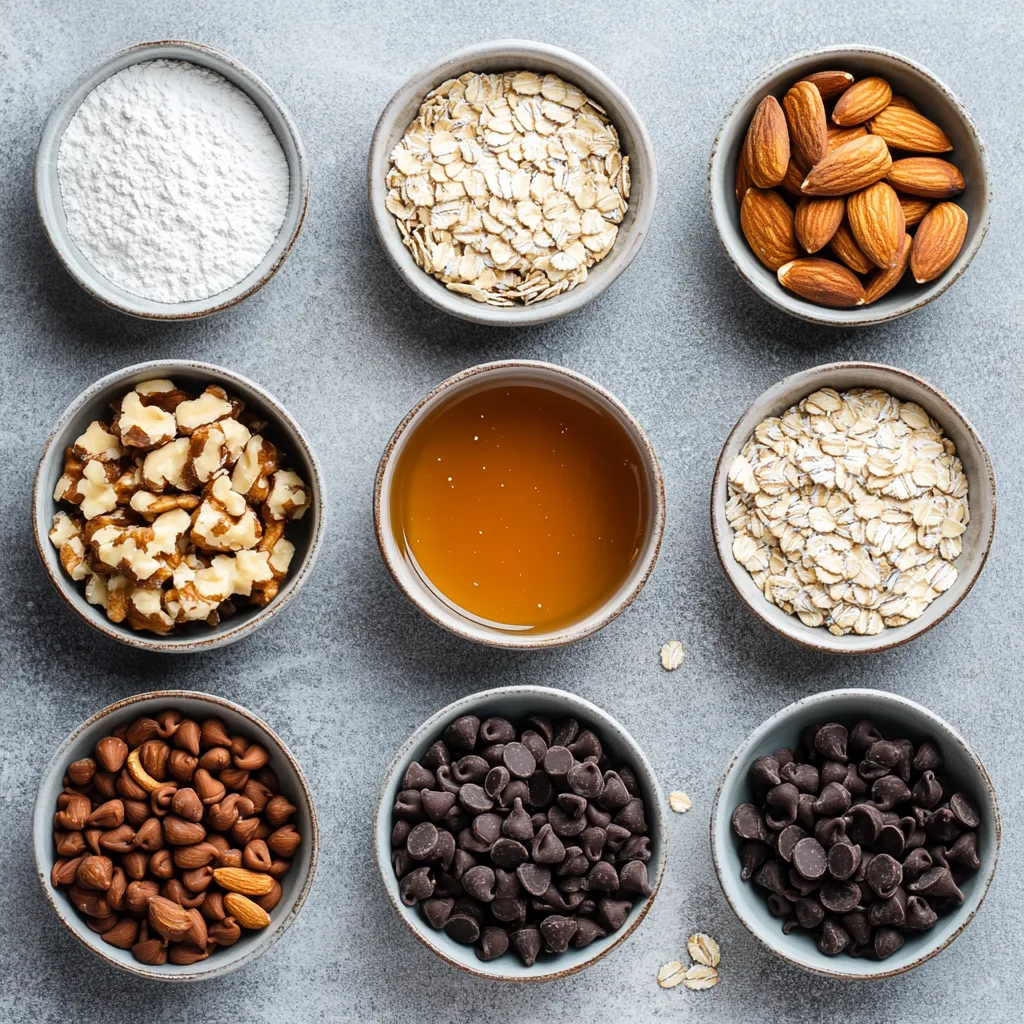
Ingredients
An in-depth understanding of the ingredients sets the stage for the recipe’s success, allowing you to see the nutritional benefits and flavors you’ll be working with.
Main Ingredients
– Natural Peanut Butter: Acts as the primary base, providing flavor and protein.
– Pure Honey or Maple Syrup: Adds natural sweetness, with maple syrup serving as a vegan alternative.
– Rolled Oats: Offers texture and helps bind the ingredients together.
Sweeteners
– Confectioners’ Sugar: Enhances the sweetness and gives a creamy texture.
– Chocolate Chips: Adds a delightful chocolate flavor that balances the nuttiness of the peanut butter.
Optional Ingredients
– Chopped Nuts: Extra crunch and flavor, such as almonds or walnuts, can be included for variety.
– Vanilla Extract: Enhances the overall flavor profile of the bliss balls.
Instructions
Understanding the preparation process will help you create these bliss balls smoothly and efficiently.
1. In a large mixing bowl, combine the natural peanut butter and honey (or maple syrup). Stir vigorously until the mixture is smooth and creamy.
2. Gradually add in the rolled oats, confectioners’ sugar, and vanilla extract. Mix thoroughly until all ingredients are well incorporated and a cohesive dough forms.
3. Gently fold in the mini chocolate chips and the chopped nuts, if you choose to include them, ensuring they are evenly distributed throughout the mixture.
4. Cover the bowl with plastic wrap or a lid and refrigerate for approximately 30 minutes. This chilling step will make the mixture easier to handle.
5. After the chilling period, use a tablespoon to scoop out portions of the mixture and roll them into bite-sized balls with your hands.
6. Arrange the formed balls on a baking sheet lined with parchment paper, ensuring they are spaced apart for easy handling.
7. Place the baking sheet in the freezer and allow the peanut butter balls to firm up for at least 1 hour.
8. Once they are set, transfer the bliss balls to an airtight container and store them in the refrigerator, where they will stay fresh for up to a week.
Chilling the Mixture
This crucial step allows the dough to firm up, making it easier to handle.
Importance of Chilling
Chilling the mixture for approximately 30 minutes is essential as it not only enhances the ability to roll the dough into balls but also allows the flavors to meld together, resulting in a richer taste. Peanut butter on its own can be soft and sticky, making it challenging to shape into perfect bite-sized balls. By refrigerating the mixture, the fats in the peanut butter solidify slightly, allowing you to work with the dough more easily and ensuring a better form for your bliss balls.
Proper Storage During Chilling
During the chilling process, ensure that your bowl is tightly covered with plastic wrap or a lid. This prevents any moisture from spoiling the mixture while still allowing it to cool down adequately. Moreover, after the bliss balls have been formed and set, proper storage in an airtight container in the fridge ensures they retain their freshness and taste. It minimizes exposure to air and humidity, keeping them delightful and tasty for up to a week.
In the next part of this recipe article, we will explore additional presentation tips and creative ways to serve your Nutty Chocolate Bliss Balls, ensuring they not only taste great but look fantastic too!
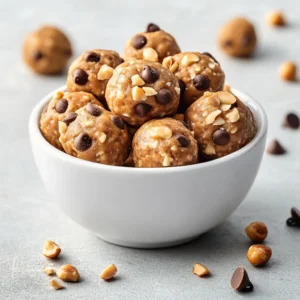
Forming the Bliss Balls
The technique used to shape the bliss balls plays a significant role in their final presentation and texture. Properly forming these treats ensures they are not just tasty but also have an appealing appearance.
Rolling Techniques
To create uniform bliss balls, use a tablespoon to scoop out the mixture. This method helps maintain consistency in size, which is essential for even chilling and presentation. Once the mixture is scooped, roll it between your palms to form smooth, bite-sized balls. Ensure that your hands are clean and moist, which prevents the mixture from sticking to your palms and helps in achieving a polished finish.
Arranging for Freezing
After rolling the balls, it’s important to arrange them thoughtfully for freezing. Line a baking sheet with parchment paper, which makes removal easy later on. Space the bliss balls apart adequately; they should not be touching. This spacing makes certain they freeze evenly and prevents them from sticking together, which can be a common issue if they are too close.
Freezing for Firmness
Creating the right texture is key to a perfect bliss ball experience. The freezing phase solidifies the mixture, allowing the flavors to meld beautifully while ensuring a delightful mouthfeel.
Freezing Duration
To achieve optimal texture, allow the bliss balls to firm up in the freezer for at least 1 hour. This firming duration is crucial; it transforms the initially soft and moldable mixture into a satisfying snack that holds its shape well.
Storage After Freezing
Once they are set, transfer the bliss balls to an airtight container. This storage method keeps them fresh and ready to enjoy at any time. When stored properly, these bliss balls can be kept in the refrigerator for up to a week, making them a convenient snack option.
Presentation Tips
Elevating the look of your Nutty Chocolate Bliss Balls can enhance the overall enjoyment of this delectable treat. An appealing presentation not only stimulates the senses but also makes sharing with friends and family more enjoyable.
Decorative Serving Suggestions
To give your bliss balls a visually striking display, consider serving them in a decorative bowl or on a platter. A stark white platter can provide a beautiful contrast to the chocolate and brown tones of the balls, catching the eye. For an extra touch, you can sprinkle some additional chocolate chips or crushed nuts on top of the bliss balls before serving. This not only adds visual appeal but also hints at what’s inside.
Fun Twists
For those wanting to take their bliss balls to the next level, consider drizzling melted dark chocolate over the top before serving. This not only enhances the flavor but adds a dramatic flair to your presentation, making your snack look gourmet. Additionally, it introduces another layer of chocolatey goodness to delight chocolate lovers.
Nutritional Information
Understanding the nutrition profile of your snack can enhance the overall experience, allowing you to enjoy them without guilt and appreciate their health benefits.
Caloric Value
Each bliss ball contains approximately 150 calories, making them a relatively guilt-free indulgence. This caloric count allows for portion control, letting you enjoy a snack that satisfies without overindulging.
Health Benefits
The ingredients in the Nutty Chocolate Bliss Balls provide an array of health benefits. Peanut butter is rich in protein and healthy fats, contributing to satiety and energy. Furthermore, the rolled oats add fiber to the mix, assisting with digestive health and providing a slow energy release. This makes bliss balls a more nutritionally balanced option compared to many traditional snacks.
Variations to Try
Exploring different versions of the bliss balls can cater to various tastes and dietary needs. Experimenting with alternative ingredients can lead to delightful new twists on this beloved snack.
Flavor Variations
A fun way to customize your bliss balls is by substituting different nut butters for unique flavors. Almond butter or cashew butter can provide a different taste profile while maintaining the creamy consistency. Additionally, consider experimenting with other mix-ins like dried fruits or seeds such as chia or flaxseed for a added nutritional boost and varied texture.
Sweetener Alternatives
If you’re looking for a different sweetness profile, try using agave syrup or coconut sugar in lieu of honey or maple syrup. These alternatives can provide distinct flavor notes and cater to specific dietary preferences, such as lower glycemic options.
Conclusion
Nutty Chocolate Bliss Balls offer a versatile and enjoyable snack option that is easy to make and customize. With their delicious flavors and healthy ingredients, they serve as a satisfying antidote to snack cravings. By exploring creative variations and presentation tips, you can make these treats even more delightful for any occasion.
Nutty Chocolate Bliss Balls: A Simple and Delicious Snack Recipe
Ingredients
- 1 cup natural peanut butter
- ½ cup pure honey or maple syrup
- 1 cup rolled oats
- ½ cup confectioners’ sugar
- ¼ cup mini chocolate chips
- ¼ cup finely chopped nuts
- ½ teaspoon pure vanilla extract
Instructions
- In a large mixing bowl, combine the natural peanut butter and honey (or maple syrup). Stir until smooth.
- Gradually add the rolled oats, confectioners’ sugar, and vanilla extract. Mix until a cohesive dough forms.
- Fold in the mini chocolate chips and chopped nuts, ensuring even distribution.
- Cover the bowl and refrigerate for about 30 minutes to make handling easier.
- Scoop out portions and roll them into bite-sized balls.
- Arrange the balls on a baking sheet lined with parchment paper.
- Freeze the baking sheet for at least 1 hour to firm up the balls.
- Transfer the balls to an airtight container and store in the refrigerator for up to a week.