
Introduction
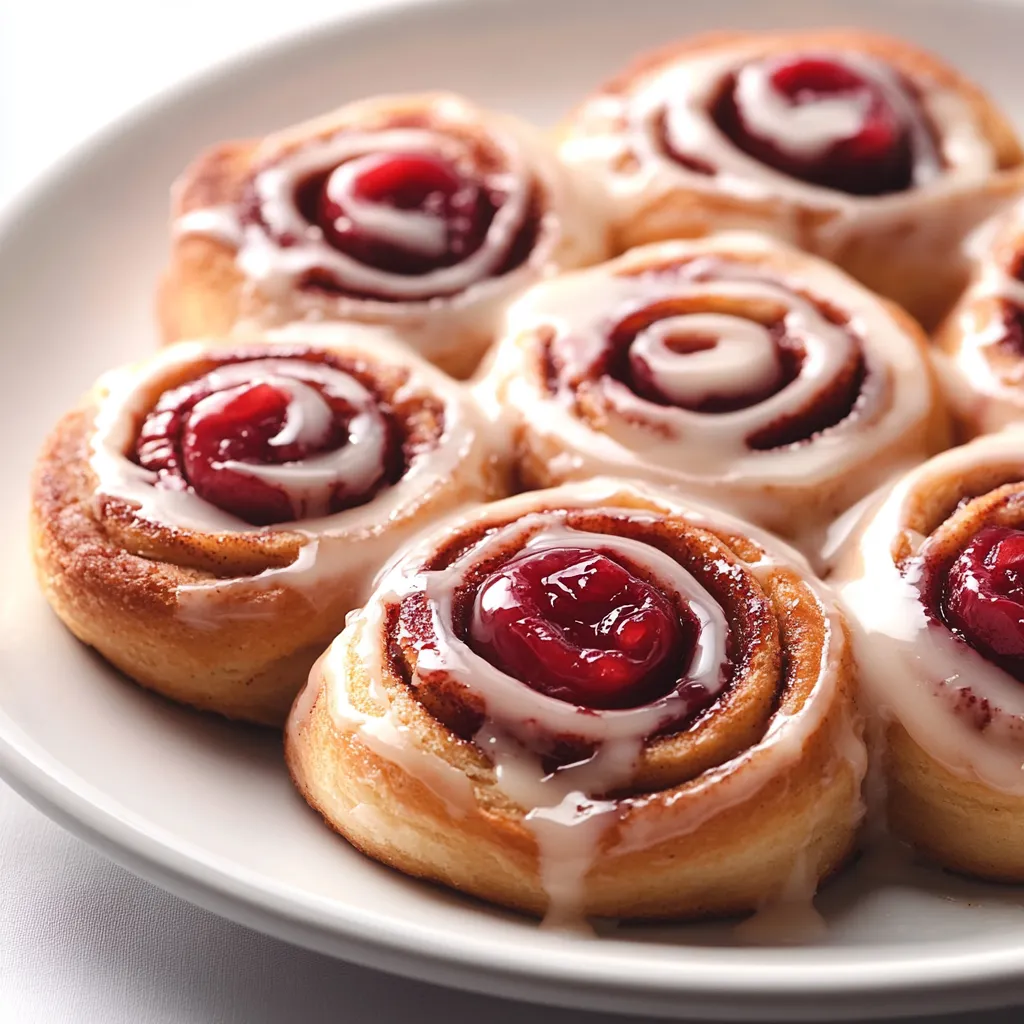
The world of baked goods is filled with comforting delights, and Cherry Cinnamon Rolls stand at the heart of this treasure trove. These soft, fluffy rolls feature a vibrant cherry filling complemented by the warm, aromatic spices of cinnamon. The delightful combination of the sweet and tart cherries enveloped in a rich dough creates an irresistible treat that is perfect for sweet breakfast moments, brunch gatherings, or even a cozy afternoon snack. The intoxicating aroma that fills your kitchen while these rolls bake transforms anticipation into enjoyment even before the first bite.
Not only do Cherry Cinnamon Rolls offer a burst of flavor, but they also present well. Served warm and topped with a smooth glaze, they make any table more inviting. Whether you are gathering friends for a brunch or just indulging yourself at home, these rolls are a delectable choice that brings cheer and comfort. With a few simple ingredients, you can create this bakery-style masterpiece right in your kitchen.
Recipe Overview
– Total Time: 2 hours
– Prep Time: 30 minutes
– Yield/Servings: 12 rolls
– Difficulty: Not specified in the recipe
This Cherry Cinnamon Roll recipe guides you through making light, airy dough filled with a delectable cherry mixture that combines the richness of brown sugar and the warmth of ground cinnamon. The accompanying glaze created from powdered sugar, milk, and vanilla extract adds the perfect finishing touch, making these rolls ideal for any occasion.
Ingredients
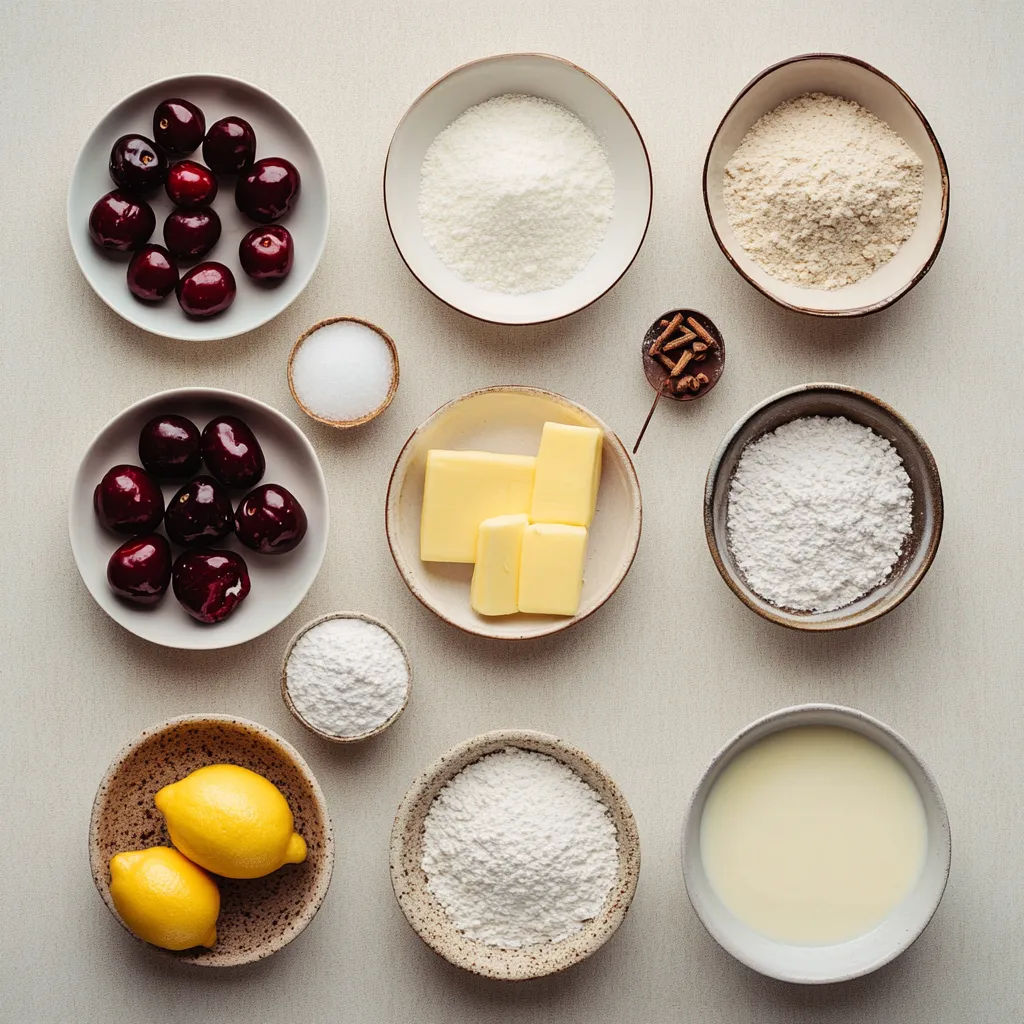
For the Dough
– 4 cups all-purpose flour
– 1/4 cup granulated sugar
– 1 packet (2 1/4 tsp) active dry yeast
– 1 cup whole milk, warmed to about 110°F (43°C)
– 1/2 cup unsalted butter, melted and slightly cooled
– 2 large eggs
– 1/2 tsp salt
For the Filling
– 1 cup fresh or frozen cherries, pitted and finely chopped
– 1/2 cup packed brown sugar
– 1 tbsp ground cinnamon
– 1 tbsp cornstarch
– 1 tbsp fresh lemon juice
– 1 tbsp unsalted butter, softened to room temperature
For the Glaze
– 1 cup powdered sugar
– 2-3 tbsp milk (adjust for desired consistency)
– 1/2 tsp pure vanilla extract
Instructions
1. Prepare the Dough: In a large mixing bowl, combine the warmed milk and granulated sugar. Sprinkle the active dry yeast over the top and allow it to sit for 5-10 minutes until foamy, indicating the yeast is activated.
2. Mix Wet Ingredients: Add the melted butter, eggs, and salt to the yeast mixture. Whisk thoroughly until all ingredients are well combined.
3. Incorporate Flour: Gradually add the all-purpose flour, mixing with a wooden spoon or spatula until a soft dough begins to form. Transfer the dough to a floured surface and knead for about 5-7 minutes until the dough is smooth and elastic.
4. First Rise: Lightly grease a bowl with oil or butter, place the dough inside, and cover it with a clean kitchen towel. Set it in a warm, draft-free area to rise for approximately 1 hour, or until the dough has doubled in size.
5. Prepare the Filling: In a medium bowl, combine the chopped cherries, brown sugar, ground cinnamon, cornstarch, lemon juice, and softened butter. Mix until all ingredients are evenly incorporated and set aside.
6. Roll Out the Dough: Once the dough has risen, gently punch it down to release air. Roll it out on a floured surface into a rectangle measuring about 16×12 inches.
7. Spread the Filling: Carefully spread the cherry filling evenly over the rolled-out dough, leaving a small border around the edges to prevent the filling from spilling out during rolling.
8. Roll and Slice: Starting from one long edge, tightly roll the dough into a log shape. With a sharp knife, cut the log into 12 equal pieces to form individual rolls.
9. Second Rise: Arrange the rolls in a greased baking dish, ensuring they are close but not touching. Cover with a towel and let them rise for an additional 30 minutes.
10. Preheat Oven: While the rolls are rising, preheat your oven to 350°F (175°C).
11. Bake: Once the rolls have risen, place them in the preheated oven and bake for 25-30 minutes, or until they are golden brown and cooked through.
12. Prepare the Glaze: In a small bowl, whisk together the powdered sugar, milk, and vanilla extract until smooth. Adjust the milk quantity as needed to achieve your desired glaze consistency.
13. Glaze the Rolls: After removing the rolls from the oven, drizzle the glaze generously over them while they are still warm, allowing it to melt slightly into the rolls.
14. Serve: Let the rolls cool for a few minutes before serving warm. Enjoy the delightful combination of sweet cherries and fragrant cinnamon in these delicious rolls!
Preparing the Dough
Activating the Yeast
To start your Cherry Cinnamon Roll journey, it’s essential to activate the yeast properly. This vital step begins with warming the milk to a comfortable temperature of around 110°F (43°C). Mixing in granulated sugar is crucial as it nourishes the yeast. After that, sprinkle the active dry yeast over the mixture and allow it to sit undisturbed. During this time, the yeast absorbs moisture and sugar, becoming frothy, which is a good sign that fermentation is taking place. A foamy top indicates that your yeast is alive and ready to work its magic in the dough.
Mixing Wet Ingredients
With the yeast activated, the next step is to introduce the wet ingredients. Add the cooled melted butter, two large eggs, and salt into the yeast mixture. The eggs add richness and structure, while the butter contributes to the overall tenderness of the rolls. Using a whisk, combine these ingredients until they are fully incorporated, creating a smooth base for your dough. This mixture lays the foundation upon which the light, fluffy rolls will be built.
Incorporating the Flour
Once your wet ingredients are well mixed, it’s time to add the flour. Gradually incorporate the all-purpose flour into the mixture, stirring with a wooden spoon or spatula. The aim here is to create a soft but manageable dough. As the dough begins to pull away from the sides of the bowl, transfer it to a floured surface. Kneading the dough for about 5-7 minutes is essential, as this develops gluten, giving the rolls their structure and chewiness. After kneading, you should have a dough that is smooth, elastic, and ready for its first rise.
First Rise
Greasing the Bowl
Preparing for the first rise is an important step in ensuring that your dough expands appropriately. Take a clean bowl and lightly grease it with either vegetable oil or softened butter. Greasing the bowl not only prevents sticking but also helps maintain the necessary environment for the yeast to flourish. This small detail plays a significant role in achieving your desired roll texture.
Covering the Dough
Once your dough has been placed in the greased bowl, it’s time to cover it up to keep that warmth in. Use a clean kitchen towel to loosely cover the bowl, creating a cozy environment for the dough to rise. Place it in a warm, draft-free area of your kitchen; ideal conditions can significantly decrease rising time. You should let the dough rest until it has doubled in size, usually taking about an hour. During this rise, the yeast will do its job, creating air bubbles that contribute to the rolls’ delightful texture.
Preparing the Filling
Combining Ingredients
While the dough is rising, you can start preparing the cherry filling that gives these cinnamon rolls their signature flavor. In a medium-sized bowl, combine fresh or frozen, pitted, and finely chopped cherries along with brown sugar, ground cinnamon, cornstarch, fresh lemon juice, and softened butter. Take your time to mix these components thoroughly. The brown sugar adds a rich depth of flavor, while the cinnamon contributes warmth and sweetness. The addition of lemon juice elevates the taste, enhancing the cherries’ natural tartness.
Setting Aside
After mixing, set the cherry filling aside to allow the flavors to meld together. This short resting time enables the filling to soak in the sugar and spice flavor, creating a more harmonious filling that will burst with each bite of your cinnamon rolls.
Rolling Out the Dough
Punching Down the Dough
Once your dough has risen for the appropriate amount of time, it’s essential to gently release the air that has built up inside. This is done by punching the dough down lightly with your fists. This process is often referred to as “deflating” the dough and is crucial for getting the right texture in your final product.
By following these steps meticulously, you’re on track to creating an enjoyable baking experience that results in delicious Cherry Cinnamon Rolls, full of flavor and authenticity.
Shaping the Dough
On a floured surface, roll the dough into a rectangle measuring approximately 16×12 inches. It’s essential to maintain an even thickness, about 1/4 inch, throughout the dough. Use a rolling pin, applying gentle pressure and frequently turning the dough to avoid sticking. This step not only creates the foundation for your rolls but also helps develop air pockets essential for a soft texture once baked.
Spreading the Filling
Application of the Filling
Carefully spread the cherry filling evenly over the rolled-out dough, ensuring to leave a small border (about 1/2 inch) around the edges to prevent overflow. Using an offset spatula or the back of a spoon can help achieve a smooth and even layer. Take care to distribute the filling evenly, allowing for a balanced taste in each bite of the finished roll.
Preparing to Roll
This step is crucial for ensuring that the filling stays within the rolls during baking. Press down gently on the filling to help it adhere to the dough, which reduces the chance of it spilling out while rolling or baking.
Rolling and Slicing
Shaping the Rolls
From one long edge, roll the dough tightly to create a log shape. Start at the edge you began applying the filling to ensure a firm and tightly packed roll. As you roll, keep an even pressure, making sure to tuck the dough under itself. This technique helps in making evenly shaped rolls, which is especially important for presentation and cooking uniformity.
Cutting the Rolls
Using a sharp knife or a bench scraper, slice the log into 12 equal pieces. A sawing motion works best to avoid squashing the rolls. A knife that has been warmed with hot water and dried can help to achieve cleaner cuts. This technique ensures that each roll is uniform in size, contributing to an even cooking experience and a delightful presentation once baked.
Second Rise
Preparing the Baking Dish
Grease a baking dish with unsalted butter or non-stick spray, taking care to thoroughly coat the bottom and sides to prevent sticking. Arrange the sliced rolls in the dish, ensuring they are close but not touching. This proximity allows the rolls to rise and support each other during baking, leading to a soft texture.
Final Rise
Cover the dish with a towel and let the rolls rise for about 30 minutes, allowing them to puff up. The rolls should increase in size visibly, becoming light and airy. For optimal rising, place the dish in a warm, draft-free environment – this could be an oven set to the lowest temperature (then turned off) or a warm spot in your kitchen.
Preheating the Oven
Setting Temperature
While the rolls rise, preheat your oven to 350°F (175°C) to ensure it’s ready for baking. Proper preheating is vital as it allows the dough to spring in the oven, developing that coveted fluffy texture while baking.
Timing the Bake
With the oven preheated, you’ll be ready to bake the rolls as soon as they finish their final rise. Ensure that your oven is empty and set to the correct temperature. The rolls should be placed in the center of the oven for even heat distribution.
Baking the Rolls
Baking Process
Once the second rise is complete, place the rolls in the oven and bake until golden brown. This process usually takes about 25-30 minutes. The key is to monitor them closely; as each oven is different, baking times might vary slightly. Rotating the baking dish halfway through can also ensure even browning.
Checking for Doneness
The rolls will be done when they appear golden and cooked through, assuring a delightful texture. You can also use a toothpick inserted into the center of a roll; if it comes out clean or with just a few crumbs, your rolls are baked perfectly.
Preparing the Glaze
Mixing Ingredients
In a small bowl, whisk together powdered sugar, milk, and vanilla extract until you achieve a smooth consistency. Start with the lower amount of milk and gradually add more to reach your desired thickness. A thicker glaze will sit nicely on the rolls, while a thinner glaze will drizzle beautifully.
Adjusting for Thickness
Feel free to adjust the amount of milk in the glaze to get your desired thickness for drizzling. A thicker glaze can provide a sweet crunch, while a thinner glaze allows for more of a liquid sweetness that seeps into the rolls.
Glazing the Rolls
Applying the Glaze
Immediately after removing the rolls from the oven, drizzle the prepared glaze over them while warm for maximum absorption. The warmth from the rolls will help the glaze melt slightly, creating a luscious, sweet coating that enhances the overall experience.
Allowing to Set
Let the glaze melt slightly into the warm rolls, creating a beautiful, sweet coating. It’s a focal point for both flavor and aesthetics, enhancing the dish’s appeal while also adding to the sweet aroma that fills your kitchen.
Serving Suggestions
Presentation Tips
For an elegant touch, serve the rolls on a decorative platter garnished with fresh cherry halves or a light dusting of cinnamon. This garnishing not only enhances the visual appeal but provides additional flavor elements that complement the cinnamon and cherry filling beautifully.
Enjoying the Rolls
These Cherry Cinnamon Rolls are best enjoyed warm, filled with sweet cherries and a hint of cinnamon, creating a delightful experience with each bite. They are perfect for breakfast, brunch, or as a sweet treat any time of day.
Technique and Texture
The technique of rolling, slicing, and rising is crucial for achieving the ideal texture of your rolls. A well-developed dough provides a light and airy roll, while the cherry filling should be juicy without being overly wet, contributing both flavor and moisture. Pay attention to the rising periods; they are fundamental in developing the rolls’ structure and texture.
Scaling, Storage, and Reheating
These rolls can easily be scaled up or down depending on your needs, with each roll remaining consistent in size and texture. For storage, keep any leftovers in an airtight container at room temperature for up to two days. To maintain their softness, you can also refrigerate them for longer preservation. For reheating, place them in the microwave for 10-15 seconds or in the oven at 350°F (175°C) for about 5-7 minutes until warmed through, ensuring you don’t dry them out.
Troubleshooting
If your rolls don’t rise properly, ensure your yeast is fresh and that the liquids aren’t too hot, as high temperatures can kill the yeast. If they appear dense after baking, likely the dough was over-kneaded; aim for a smooth, elastic dough that will still spring back when pressed.
FAQs
Can I use different fruits for the filling?
Not specified in the recipe.
Can I prepare the dough ahead of time?
You can prepare the dough and let it rise in the refrigerator for up to 24 hours before proceeding with shaping and baking.
What’s the best way to store leftovers?
Store them in an airtight container at room temperature for up to two days or refrigerate for longer preservation.
What adjustments can be made for a gluten-free version?
Not specified in the recipe.
In conclusion, these Cherry Cinnamon Rolls with Homemade Filling achieve a perfect balance of sweetness and spice, enhanced with the tartness of cherries. Their soft and fluffy texture, combined with the inviting aroma of freshly baked rolls, makes them a delightful option for any occasion. The total time for preparation and baking aligns well for a delicious treat that’s sure to impress.
Cherry Cinnamon Rolls with Homemade Filling Recipe
Ingredients
- 4 cups all-purpose flour
- ¼ cup granulated sugar
- 1 packet active dry yeast
- 1 cup whole milk
- ½ cup unsalted butter
- 2 large eggs
- ½ tsp salt
- 1 cup fresh or frozen cherries
- ½ cup packed brown sugar
- 1 tbsp ground cinnamon
- 1 tbsp cornstarch
- 1 tbsp fresh lemon juice
- 1 tbsp unsalted butter
- 1 cup powdered sugar
- 2-3 tbsp milk
- ½ tsp pure vanilla extract
Instructions
-
Combine warmed milk and granulated sugar in a bowl, sprinkle yeast, and let sit until foamy.
-
Add melted butter, eggs, and salt to the yeast mixture and whisk until combined.
-
Gradually mix in flour until a soft dough forms, then knead on a floured surface for 5-7 minutes.
-
Grease a bowl, place dough inside, cover, and let rise in a warm area for about 1 hour.
-
Mix cherries, brown sugar, cinnamon, cornstarch, lemon juice, and softened butter in a bowl for the filling.
-
Roll out the risen dough into a rectangle, spread the cherry filling, and roll tightly.
-
Cut the log into 12 equal pieces and arrange in a greased baking dish.
-
Cover and let rolls rise for an additional 30 minutes.
-
Preheat oven to 350°F (175°C) and bake rolls for 25-30 minutes until golden brown.
-
Whisk together powdered sugar, milk, and vanilla for the glaze, then drizzle over warm rolls before serving.