
Introduction
In the world of desserts, few treats can compete with the irresistibly delicious combination of peanut butter and chocolate. Butterfinger Delight Balls take this heavenly fusion to new heights, combining the creamy richness of peanut butter with the crunchy texture of Butterfinger candy bars. These little balls of joy are not only rich and indulgent but also straightforward to make, making them perfect for various occasions. Whether you’re preparing for a festive gathering, celebrating a birthday, or simply indulging in a sweet tooth craving, these delightful bites are sure to impress both family and friends.
Imagine holding a bite-sized ball that promises to deliver a burst of flavors and textures—creamy peanut butter, crunchy candies, and smooth chocolate all in one delicious mouthful. The best part? They are no-bake, meaning you can whip them up quickly without the hassle of turning on the oven. Perfect for a last-minute dessert or a planned treat, Butterfinger Delight Balls seamlessly blend simplicity and satisfaction, making them a go-to in your dessert repertoire.
If you’re ready to elevate your dessert game, get your mixing bowl and let’s dive into the delightful world of Butterfinger Delight Balls. This treat combines rich, nutty flavors with a hint of sweetness and a satisfying crunch that is hard to resist. Let’s explore the essential details to create this fantastic dessert.
Recipe Overview
– Prep Time: 15 minutes
– Cook Time: 5 minutes
– Total Time: 50 minutes
– Course: Dessert
– Cuisine: American
– Servings: 12
– Calories: Approximately 200 per serving
Butterfinger Delight Balls are a no-bake dessert that combines simplicity with incredible flavor. This recipe yields 12 servings, making it perfect for sharing among family and friends. With a preparation time of only 15 minutes and a cook time of 5 minutes, you can enjoy these delectable treats in less than an hour. Each ball is approximately 200 calories, allowing for a sweet indulgence without the guilt.
Ingredients
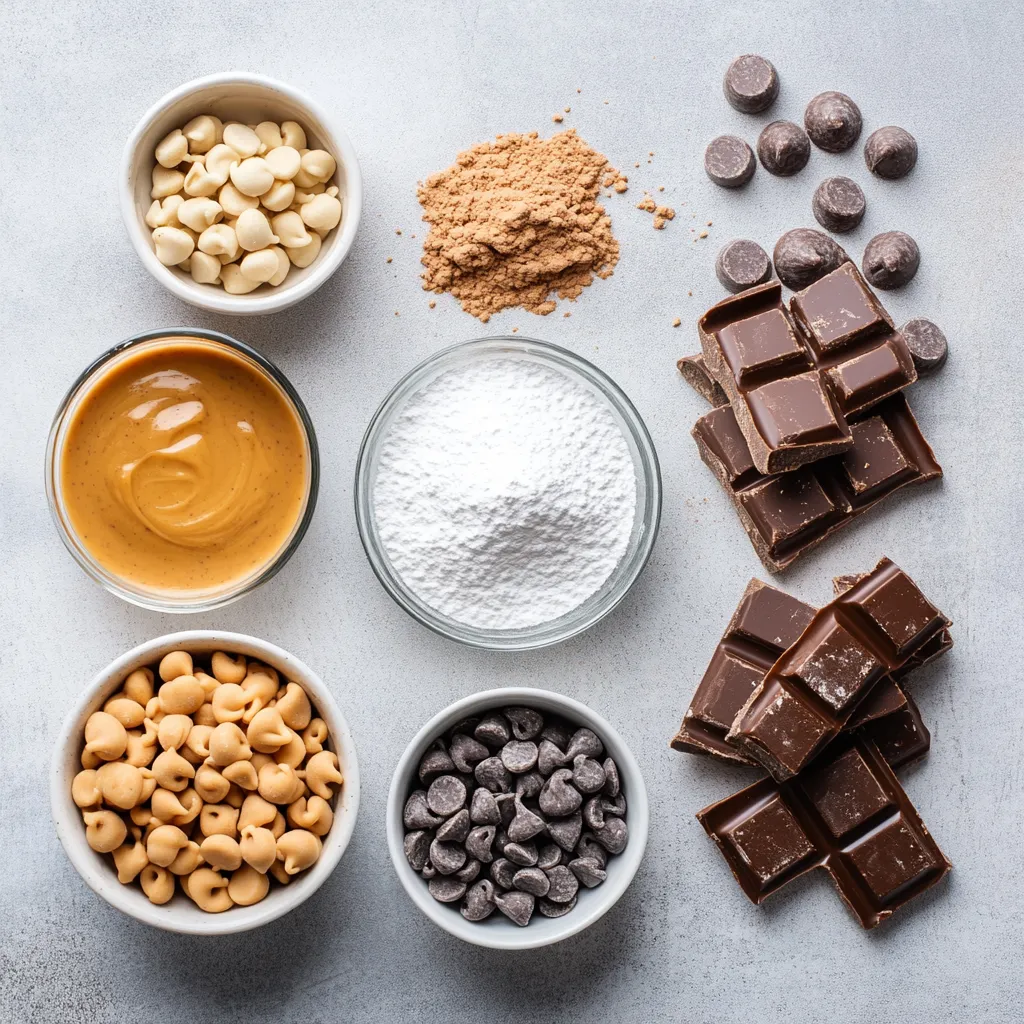
The key to creating the perfect Butterfinger Delight Balls lies in the quality and proportions of the ingredients. Below is a detailed list of the necessary components to ensure your dessert turns out just right:
– 1 cup creamy peanut butter
– 2 cups powdered sugar
– 1 cup crushed Butterfinger candy bars
– 1 cup milk chocolate chips
– 1 tablespoon coconut oil
Equipment Needed
Understanding the tools and devices you will require can streamline the process of making Butterfinger Delight Balls.
Mixing Tools
– Large mixing bowl
– Spoon or spatula for mixing
Shaping Tools
– Parchment-lined baking sheet
– Measuring cups
Melting Chocolate Tools
– Microwave-safe bowl
– Microwave for melting chocolate
Step-by-Step Instructions
This section breaks down the process into clear steps, ensuring that replicating the recipe at home is effortless.
Mixing the Base
1. In a large mixing bowl, combine the creamy peanut butter and powdered sugar.
2. Stir vigorously until the mixture is smooth and fully blended, ensuring there are no lumps.
The base of your Butterfinger Delight Balls is formed by combining creamy peanut butter with powdered sugar. Using a large mixing bowl, the technique for combining these ingredients plays a significant role in the texture and overall consistency of the final product. Stirring vigorously ensures a creamy blend that delivers a delightful mouthfeel.
Incorporating Flavor
3. Gently fold in the crushed Butterfinger candy bars, making sure they are evenly distributed throughout the peanut butter mixture.
Introducing crushed Butterfinger candy bars adds an incredible depth of flavor. Not only does the candy offer a satisfying crunch, but it also helps infuse the entire mixture with its iconic buttery toffee flavor. The key here is to fold gently, ensuring the pieces remain intact but are well integrated into the peanut butter blend.
Shaping the Balls
4. Using your hands, shape the mixture into small balls, approximately 1 inch in diameter, and place them neatly on a parchment-lined baking sheet.
Once the mixture is fully blended, it’s time to shape these delightful treats. Taking small portions of the mixture, roll them into balls about one inch in diameter. Carefully placing them on a parchment-lined baking sheet prevents sticking and provides an easy way to transfer them to the refrigerator later.
Preparing the Chocolate Coating
5. In a microwave-safe bowl, add the milk chocolate chips and coconut oil. Heat in the microwave in 30-second intervals, stirring after each interval until the chocolate is completely melted and achieves a smooth consistency.
Melting the chocolate chips is a crucial step in achieving that luscious coating that encases the peanut butter balls. Using coconut oil adds a silky texture to the chocolate, ensuring it glides smoothly over the balls once dipped. The microwave method allows for controlled melting, which is key to preventing overheating the chocolate.
Coating the Balls
6. Carefully dip each peanut butter ball into the melted chocolate, ensuring they are fully coated. Return the coated balls to the parchment-lined baking sheet.
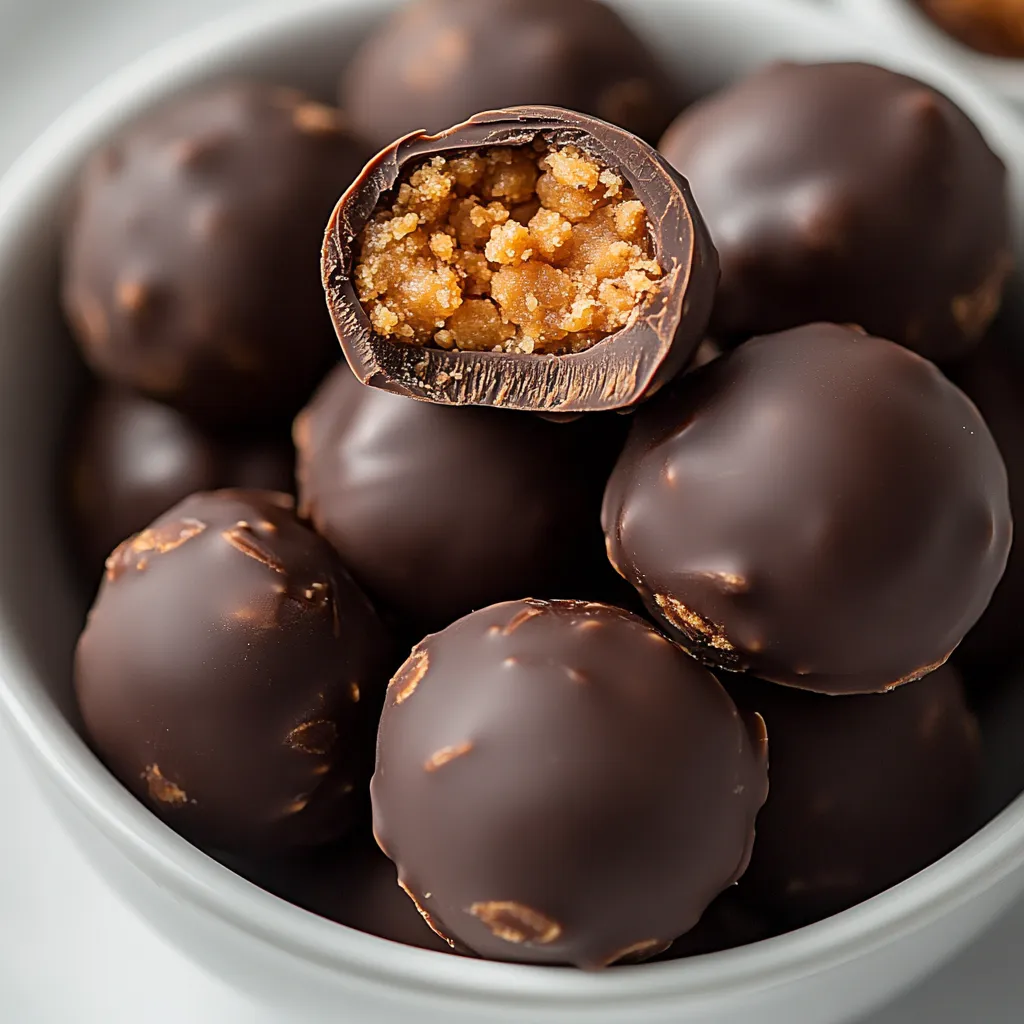
The exciting part of the process is dipping each ball into the melted chocolate. This step transforms the simple peanut butter mixture into a decadently rich candy. Ensuring each ball is thoroughly coated will enhance both the flavor and visual appeal of your Butterfinger Delight Balls.
Setting the Treats
7. After all the balls have been coated in chocolate, refrigerate them for at least 30 minutes, or until the chocolate has hardened and set.
Once coated, refrigerating the treats ensures that the chocolate hardens perfectly. This step is vital for achieving that wonderful snap when you bite into the balls. After allowing them to set, you have created a delectable treat that can be enjoyed chilled or at room temperature.
Optional: For an extra touch, sprinkle some crushed Butterfinger on top of the chocolate coating before it sets, adding a delightful crunch and visual appeal!
In Part 2 of this article, we will explore more about enjoying these treats and additional tips for making the most of your Butterfinger Delight Balls.
Dip Each Peanut Butter Ball into the Melted Chocolate
Once the peanut butter balls are perfectly shaped and resting on the parchment-lined baking sheet, it’s time to elevate them to new heights by dipping each ball into the melted chocolate. Using a fork or toothpick can simplify this process, allowing for easier maneuvering.
To begin, ensure that the melted chocolate mixture is smooth and free of clumps. Carefully take a peanut butter ball, and dip it into the melted chocolate. Ensure it is fully submerged, allowing the chocolate to coat the ball completely. This coating not only adds flavor but also creates a beautiful glossy finish that is visually appealing.
Once coated, gently lift the ball out of the chocolate and allow any excess chocolate to drip back into the bowl. This prevents a puddle of chocolate from forming beneath the ball, ensuring a neat presentation once they’ve cooled. After dipping, return each coated ball to the parchment-lined baking sheet, arranging them with a bit of space in between to avoid sticking.
Return Coated Balls to the Baking Sheet for Cooling
With all the peanut butter balls dipped in chocolate and neatly arranged, it’s essential to allow them to cool properly. This can be done on the same baking sheet used for shaping the balls. The parchment paper not only makes cleanup easier but also prevents the balls from sticking when the chocolate hardens.
Be patient during this step, as letting the chocolate set undisturbed is key to achieving the desired firmness and texture. If desired, you could place the baking sheet in a cooler area of your kitchen or in the refrigerator to expedite the hardening process.
Chilling the Treats
Chilling is a crucial step that ensures your Butterfinger Delight Balls set perfectly. The recipe indicates a chilling time of at least 30 minutes, which provides ample time for the chocolate to fully harden. During refrigeration, the chocolate coating will solidify, ensuring that each bite is a satisfying crunch combined with the creamy peanut butter interior.
Once the balls have been placed in the refrigerator, it’s wise to check on them after the 30-minute mark. Gently touch the chocolate coating to confirm that it has hardened. A properly set chocolate layer will create a delightful contrast to the softer peanut butter filling, enhancing the overall snacking experience.
Optional Touches for Enhancement
To take your Butterfinger Delight Balls from delicious to extraordinary, consider these optional touches. These simple enhancements can amplify both the flavor and visual appeal of your treats.
Sprinkling Crushed Candy
One delightful way to add extra flair to each chocolate-coated Butterfinger ball is by sprinkling a bit of crushed Butterfinger candy on top before the chocolate sets. Not only does this provide an attractive visual element, but it also amplifies the buttery caramel flavor that pairs beautifully with the chocolate and peanut butter blend.
To achieve this, after dipping the balls in melted chocolate, immediately sprinkle a small amount of crushed Butterfinger on top of each ball while the chocolate is still wet. This will help the candy pieces adhere better and create a fantastic finishing touch that will delight guests and family alike.
Flavor Variations
While the original recipe provides a classic flavor profile that many will love, it can be fun to explore variations as well. For instance, consider using dark chocolate or white chocolate instead of milk chocolate for dipping. Each variation produces a different flavor profile and can enhance the richness of the treats.
Additionally, a sprinkle of sea salt atop the melting chocolate can provide a sweet-salty balance that enhances the overall flavor. This flavor contrast, combined with the creamy peanut butter and crunchy Butterfinger, can elevate the overall experience and make each bite even more irresistible.
Serving Suggestions
When it comes to serving your Butterfinger Delight Balls, presentation is essential. These delightful treats can be displayed in several creative ways that are sure to impress.
Presentation Ideas
Arranging the balls on a decorative plate or platter can create a stunning visual presentation. Using vibrant colored plates or serving trays can highlight the chocolate’s shine and the candy’s textures. Additionally, consider employing small cupcake liners for an individual serving option, adding an element of charm and tidiness to your dessert spread.
Incorporating garnishes or decorative touches, such as edible flowers or fresh mint leaves, can also enhance the overall appearance when catering to special occasions.
Pairing Suggestions
When it comes to pairing drinks with your Butterfinger Delight Balls, consider serving them alongside a glass of milk or brewed coffee for a comforting and indulgent experience. These beverages complement the rich flavors of the treats, making them ideal for an afternoon snack or dessert.
These treats are perfect for dessert tables at various gatherings, such as birthday parties, family celebrations, or festive holidays. Their fun appearance and decadent taste make them a crowd-pleaser that appeals to both children and adults.
Storage Instructions
To enjoy your Butterfinger Delight Balls at their best, proper storage is key. Following the right protocol can ensure your treats remain fresh, delicious, and ready for any occasion.
Refrigeration
For optimal freshness, store your Butterfinger Delight Balls in an airtight container. This will help prevent moisture and odors from compromising their delicious flavor profile. In the refrigerator, they can last for up to one week, allowing you to savor them at your leisure.
Freezing
If you wish to prolong the shelf life even further, freezing the balls is a great option. Before freezing, ensure each ball is laid out in a single layer until the coating has fully hardened. Then, transfer the cooled balls into a freezer-safe container, separating layers with parchment paper.
To serve after freezing, simply thaw the balls in the refrigerator for several hours or overnight. This method helps maintain their texture and flavor, letting you enjoy these treats anytime a craving strikes.
Nutritional Information
Understanding the nutritional aspect of your treats can be insightful for those mindful of their intake.
Caloric Content
Each Butterfinger Delight Ball contains approximately 200 calories per serving. These calorie details help in planning for gatherings and ensuring balance during treats indulgence.
Ingredient Benefits
The choice of ingredients also contributes significant nutritional benefits. Peanut butter is known for its healthy fats and protein content, making it a filling and satisfying ingredient. Meanwhile, chocolate chips contain antioxidants, contributing positively to the dessert’s nutritional profile. Together, these ingredients create a treat that is delicious, with a beneficial balance of flavors and nutrients.
Conclusion
Butterfinger Delight Balls are a truly indulgent treat that perfectly balances creamy, crunchy, and chocolaty flavors. These bites come together quickly, making them an excellent choice for any occasion. Whether chilled or at room temperature, each ball promises a delightful texture and taste experience, captivating the hearts of dessert lovers everywhere.

Butterfinger Delight Balls: A Delectable Dessert Treat
Ingredients
- 1 cup creamy peanut butter
- 2 cups powdered sugar
- 1 cup crushed Butterfinger candy bars
- 1 cup milk chocolate chips
- 1 tablespoon coconut oil
Instructions
- In a large mixing bowl, combine the creamy peanut butter and powdered sugar until smooth.
- Gently fold in the crushed Butterfinger candy bars until evenly distributed.
- Shape the mixture into small balls, about 1 inch in diameter, and place on a parchment-lined baking sheet.
- In a microwave-safe bowl, melt the milk chocolate chips and coconut oil in 30-second intervals, stirring until smooth.
- Dip each peanut butter ball into the melted chocolate, ensuring they are fully coated.
- Return the coated balls to the parchment-lined baking sheet.
- Refrigerate for at least 30 minutes until the chocolate hardens.
- Serve chilled or at room temperature and enjoy!