
Introduction
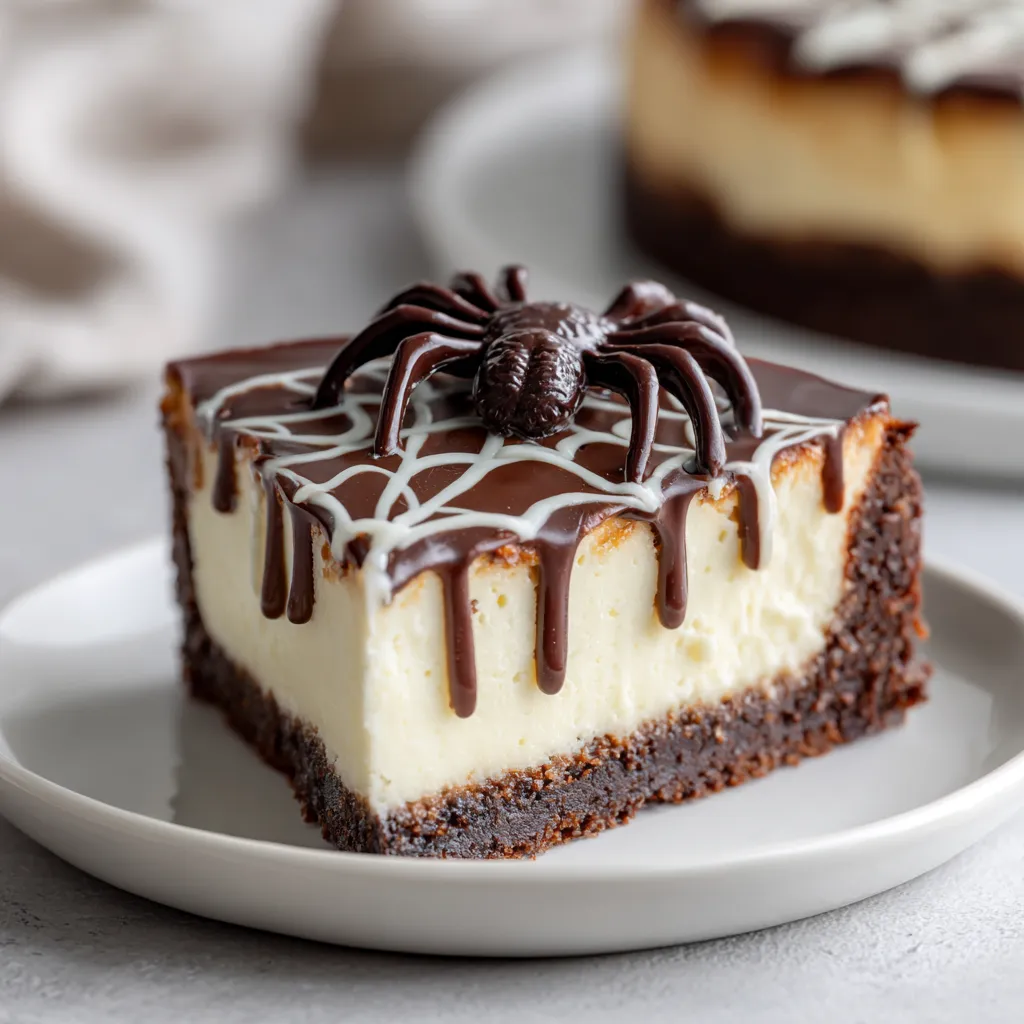
The Creepy Crawly Cheesecake, a delightful dessert that stirs both the imagination and the taste buds, is the perfect way to embrace the spirit of Halloween. Imagine slicing through a rich, creamy cheesecake topped with an enticing spider web design, all while a dark chocolate spider lingers menacingly atop the creation. This dessert not only satisfies the craving for something sweet but also evokes a bit of the spooky season.
Crafted with a luscious cheesecake filling nestled in a chocolatey graham cracker crust, this dessert serves as a conversation starter for any Halloween gathering. Its unique presentation makes it a fun addition to parties, family gatherings, or festive fall celebrations. Pair it with some ghost-shaped candies or serve it on dark platters for an added touch of spookiness.
Recipe Overview
– Total Time: 5 hours
– Yield/Servings: 12 slices
– Difficulty: Not specified in the recipe.
Ingredients
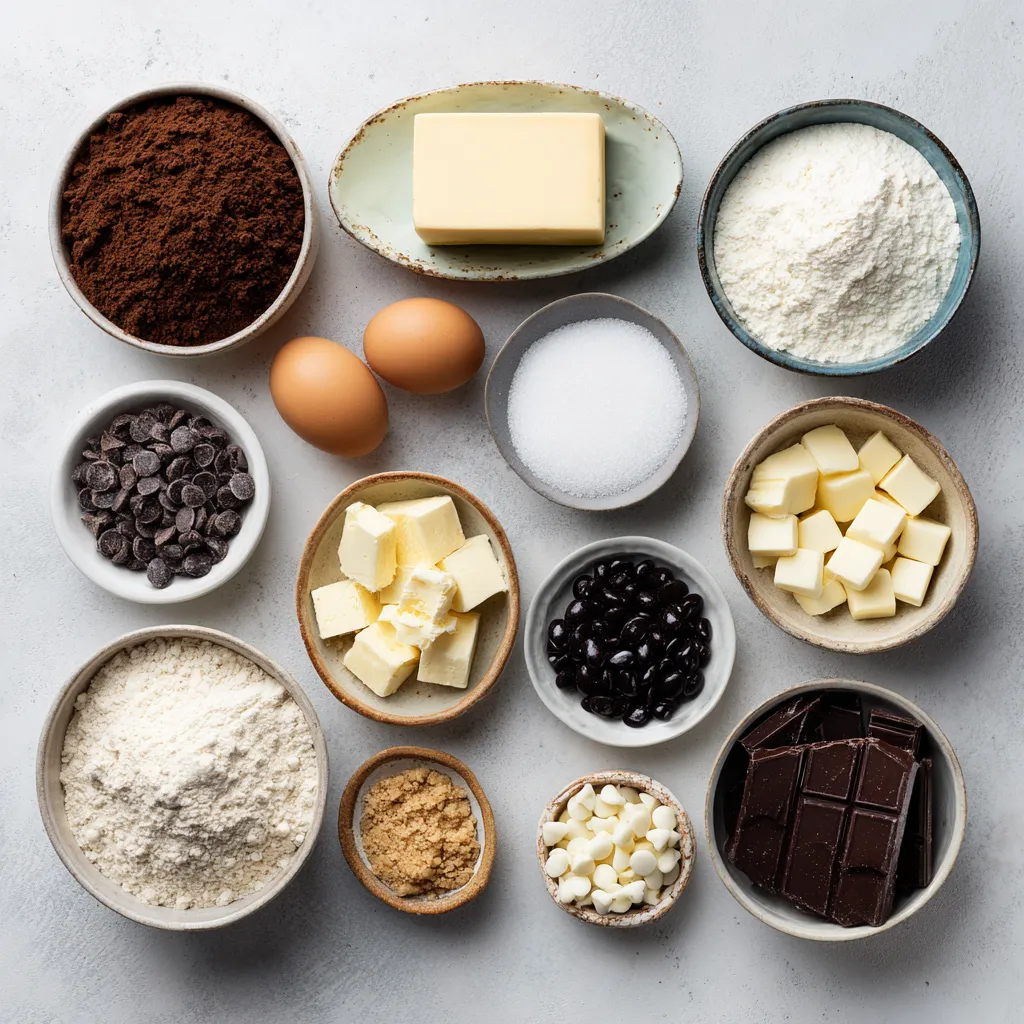
– For the Crust:
– 1 ½ cups graham cracker crumbs
– ½ cup unsweetened cocoa powder
– ½ cup granulated sugar
– ½ cup unsalted butter, melted
– For the Cheesecake Filling:
– 24 oz cream cheese, softened to room temperature
– 1 cup granulated sugar
– 1 tsp vanilla extract
– 3 large eggs
– 1 cup sour cream
– ¼ cup all-purpose flour
– For the Spider Web Decoration:
– 1 cup white chocolate chips
– 1 tbsp coconut oil
– Black food coloring
– 1 cup dark chocolate chips (for the spider)
– For the Spider:
– 1 cup dark chocolate chips
– 2 tsp coconut oil
– Black licorice or chocolate-covered almonds (for spider legs)
Preparing the Crust
To prepare the crust for the Creepy Crawly Cheesecake, start by preheating your oven to 325°F (160°C). In a mixing bowl, combine the graham cracker crumbs, unsweetened cocoa powder, granulated sugar, and melted butter. Using a fork or your hands, mix these ingredients until they achieve a crumbly texture. This step is essential as it guarantees that all dry ingredients are evenly coated with the melted butter, ensuring moisture and flavor in every bite.
Once the mixture is ready, it’s time to transfer it into a 9-inch springform pan. Firmly press the crumb mixture on the bottom of the pan to form an even layer. This firmness is crucial; a well-pressed crust holds the cheesecake filling effectively and makes for a cleaner slice. Bake the crust in the preheated oven for about 10 minutes. Baking solidifies the crust and enhances its flavor profile by allowing it to develop a light toasty note. After baking, allow the crust to cool completely; this cooling step is vital to ensure that it doesn’t melt or disturb the cheesecake filling when poured in.
Making the Cheesecake Filling
Creating the cheesecake filling for your Creepy Crawly Cheesecake is a straightforward yet critical step in ensuring your dessert is both luscious and rich. Start by placing the softened cream cheese in a large mixing bowl, along with granulated sugar. Using an electric mixer, beat these ingredients together until the mixture is smooth and creamy; this process should take a few minutes. The goal is to eliminate any lumps in the cream cheese, resulting in a velvety texture. After mixing, incorporate the vanilla extract, continuing to blend until fully integrated.
Next, introduce the eggs to the mixture, one at a time. It’s important to mix thoroughly after each egg addition. This helps create a cohesive filling, as the eggs not only act as a binding agent but also contribute to the cheesecake’s overall texture and richness. After the eggs are well incorporated, gently fold in the sour cream and flour. Take care during this step to mix just until combined, as over-mixing can introduce air bubbles that might affect the cheesecake’s consistency during baking.
With the filling prepared, carefully pour it over the cooled crust. Use a spatula to smooth the surface of the cheesecake, ensuring it looks uniform before it goes into the oven.
Baking the Cheesecake
Baking the cheesecake properly is essential for achieving that perfect texture—creamy yet dense without being overly firm. Once your cheesecake is assembled, place it in the preheated oven and allow it to bake for approximately 60-70 minutes. During this time, you’ll notice the edges of the cheesecake will set while the center remains slightly wobbly. This wobbliness is key; it indicates the cheesecake will firm up as it cools.
After your baking time is complete, turn off the oven and slightly crack the door open. This residual heat helps the cheesecake cool slowly, minimizing the risk of cracks on the surface—a common concern when making cheesecakes. Let the cheesecake cool in this manner for about an hour, allowing the flavors to meld and giving it the right texture before transferring it to the refrigerator.
Preparing the Spider Web Decoration
The final decorative touch to your Creepy Crawly Cheesecake is the fun spider web design. Begin by melting the white chocolate chips and coconut oil together in a microwave-safe bowl. Heat in short intervals, stirring every 30 seconds until the mixture becomes silky and smooth. Achieving the right consistency is crucial; if it’s too thick, you won’t be able to pipe it neatly.
Once the melted chocolate is glossy, add a few drops of black food coloring. Stir until you attain a dark gray hue, which will stand out nicely against the lighter tones of the cheesecake. After your cheesecake has chilled completely in the refrigerator for at least 4 hours (or overnight for better results), transfer the melted chocolate into a piping bag. Starting from the center of the cheesecake, pipe concentric circles outward. Use a toothpick or skewer to create the iconic spider web design by dragging lines from the center toward the edges. This step not only enhances aesthetics but also adds a fun element to the dessert, delighting guests of all ages.
{{image_3}}
Adding black food coloring for visual effect
In the Creepy Crawly Cheesecake, the visual appeal is amplified by the addition of black food coloring to the white chocolate web. This transformation into a dark gray hue not only enhances the spooky aesthetic of the dessert but also creates a striking contrast against the creamy cheesecake filling. When incorporating black food coloring, ensure that you add just a few drops at a time, mixing thoroughly to monitor the color saturation. This technique allows for greater control over the final shade, ensuring the spider web design achieves the desired ominous effect beneficial for any Halloween gathering.
Techniques for piping the web design and using toothpicks
Piping the spider web design requires a steady hand and some practice. When filling a piping bag with the melted white chocolate mixture, ensure that the tip is cut small enough for precise lines but wide enough to allow the chocolate to flow without obstruction. Start at the center of the cheesecake, and create concentric circles outward, gradually working your way to the edge.
After letting the circles set for a moment, use a toothpick or skewer to draw lines from the center to the edges. It’s important to apply gentle pressure; dragging the toothpick too hard can disrupt the circular pattern. This technique not only creates the classic spider web effect but also encourages visual interest, making the cheesecake more engaging for guests.
Creating the Spider
Instructions for melting dark chocolate and its importance in creating the spider
To create the chocolate spider that adorns the cheesecake, begin by melting the dark chocolate chips mixed with coconut oil. The addition of coconut oil helps achieve a smoother consistency, making it easier to coat the spider’s body and legs. Melt the mixture in short bursts in the microwave, stirring in between until it reaches a glossy finish. This glossy finish not only looks impressive but also contributes to the texture, as the chocolate will firm up nicely once set, giving the spider a polished appearance.
Alternatives for spider legs
For those interested in tweaking the dessert, alternatives for the spider legs can include pretzel sticks for a crispy texture or even edible decorative sprinkles to create a colorful contrast. Chocolate-covered raisins can also serve as an option; with a little creativity, the legs can be crafted from various candies. These alternatives can vary the look of the spider while maintaining the festive feel of the cheesecake.
Tips for assembling the spider for visual appeal
When assembling the spider, it’s crucial to ensure that the legs are evenly spaced for aesthetic symmetry. Use melted chocolate as the ‘glue’ to attach the legs securely to the body. Allow the chocolate to dry slightly before placing the spider atop the cheesecake; this will help prevent it from toppling over. Additionally, consider positioning the spider slightly askew, as a slightly crooked position adds to the playful creepiness of the final presentation.
Assembling the Cheesecake
Methods for placing the spider on the cheesecake
Once the cheesecake is adorned with the spider web design, carefully place the finished chocolate spider on top. For a dramatic effect, consider positioning the spider near the center or slightly offset so it looks as if it’s creeping toward the edge. Use a thin spatula to lift the spider if necessary, being cautious not to disturb the web underneath.
Importance of chilling before serving
Chilling the cheesecake before serving is essential for ensuring the texture remains stable and creamy. It helps to solidify the cheesecake filling and creates a refreshing contrast to the rich chocolate and decorations. Ideally, the cheesecake should chill for at least an additional hour post-decoration, allowing all elements to set firm.
Additional whimsical touches to consider
To enrich the theme further, edible googly eyes can be added to the spider, or you could even use small candy eyeballs for an even spookier presentation. Presenting the cheesecake on a decorative Halloween-themed platter, alongside some themed candies, can enhance the visual oven and make the dessert the star of the gathering.
Serving Suggestions
Ideal pairings with the cheesecake
Creepy Crawly Cheesecake pairs wonderfully with beverages that complement its rich chocolate flavor. A robust coffee or espresso can nicely offset the sweetness, while a sweet dessert wine can elevate the overall dining experience. If serving at a themed party, consider concocting a ghoulish-themed beverage such as a dark berry smoothie or spooky sparkling punch.
Creative presentation ideas
Serving slices of cheesecake on black platters adds to the overall aesthetic, creating a dramatic backdrop that highlights the dessert’s intricate details. For an extra whimsical touch, garnishing each slice with ghost-shaped candies or dusting them lightly with powdered sugar can visually enhance their appeal while fitting the Halloween theme.
How to keep the cheesecake looking fresh for guests
If you’re preparing the cheesecake a day in advance, ensure you cover it with plastic wrap or place it in a cake dome to prevent it from drying out. Keeping it in the refrigerator until ready to serve will maintain its fresh appearance and flavor. Avoid placing it in direct light to prevent the chocolate decorations from melting or fading.
Storage Tips
Guidelines for storing leftovers
Leftover Creepy Crawly Cheesecake can be stored in the refrigerator. Use an airtight container or cover tightly with plastic wrap to protect it from odors while keeping it moist. If you’ve decorated the cheesecake with chocolate, it’s advisable to store it without any decorations if you plan on keeping it for more than a couple of days, as the chocolate may lose its visual appeal.
Best practices for maintaining flavor and texture
To ensure the flavor and texture remain intact, consume leftover cheesecake within 4 to 5 days. Each slice should be stored separately if possible, as this helps avoid unnecessary exposure and keeps the cheesecake fresher for longer.
How long the cheesecake can be kept in the refrigerator
The cheesecake should maintain its flavor and quality well for about a week when stored properly. However, its appearance may begin to degrade after a few days, especially if decorated with chocolate, so it’s best to enjoy it sooner rather than later.
Variations and Customizations
Suggestions for flavor variations
While the traditional Creepy Crawly Cheesecake is rich in chocolate, there are possibilities to explore alternative flavor bases. For example, you might consider using white chocolate for a lighter and sweeter experience. Flavored extracts, such as peppermint, can be added to the filling to introduce a new layer of flavor, particularly delightful around the holidays.
Ideas for alternate toppings
Considering seasonal toppings could also transform the appearance of the cheesecake. Pumpkin puree with spice-infused whipped cream would suit an autumnal theme, while a minty green layer could be used for a unique monster-inspired treat.
Dietary modifications
If catering to specific dietary needs, gluten-free graham crackers can replace traditional ones in the crust, making it accessible for those with gluten sensitivities.
Conclusion
This Creepy Crawly Cheesecake offers a deliciously creamy texture balanced by a rich chocolate crust, bringing festive fun to any gathering. With a total preparation and chilling time of about five hours, it combines simple steps with impressive visual results, making it a memorable treat for any spooky occasion.
Creepy Crawly Cheesecake Recipe for Halloween Celebrations
Ingredients