


Introduction
Delightful tea buns are a charming addition to any afternoon tea service or casual coffee break. These soft, fluffy treats are not only easy to make but also incredibly versatile, serving as a delightful companion to a steaming cup of tea or coffee. Whether enjoyed plain, with a spread of butter, or filled with sweet additions like raisins or currants, tea buns have a unique way of brightening up any moment. The aroma of freshly baked tea buns wafting through the kitchen is an experience that evokes warmth and comfort, reminding us of the simple joys found in homemade baked goods.
The beauty of tea buns lies in their simplicity. With just a handful of basic ingredients and a straightforward preparation process, anyone can create these delightful treats at home. The satisfaction of pulling a batch of golden-brown tea buns from the oven is unmatched, making baking them a rewarding experience for both novice and experienced bakers alike. Whether you’re hosting a tea party, looking to impress guests, or simply craving a warm snack, these tea buns are sure to please.
The History and Tradition of Tea Buns
The origins of tea buns can be traced back to various cultures around the world, each contributing their own unique twist to this delightful baked good. Traditionally, tea buns are thought to have originated in England during the 18th century, where the practice of afternoon tea became popular among the upper class. This social ritual, which included a light meal accompanied by tea, provided the perfect opportunity for introducing sweet baked treats.
As the tradition of afternoon tea spread, so did the popularity of tea buns. In England, they were often served alongside scones and other pastries, becoming a staple in tea time gatherings. The combination of tea and baked goods fostered a sense of community and warmth, allowing friends and family to gather and enjoy each other’s company.
In other parts of the world, similar baked goods have emerged, often incorporating local flavors and ingredients. For example, in Sweden, kanelbullar (cinnamon buns) are a popular choice during “fika,” a coffee break that encourages social interaction. Similarly, in North America, variations of tea buns can be found in many bakeries, reflecting the diverse culinary influences that have shaped our understanding of this delightful treat.
The significance of tea time and baked goods in social settings cannot be overstated. These moments allow for connection, conversation, and the sharing of experiences. As tea buns have evolved through the years, they have maintained their status as a beloved accompaniment to hot beverages, embodying the spirit of hospitality and comfort.
Understanding the Ingredients
To create the perfect batch of delightful tea buns, it’s essential to understand the role of each ingredient used in the recipe. Here’s a closer look at the key components that contribute to the flavor, texture, and overall success of your tea buns:
All-Purpose Flour
All-purpose flour is the backbone of any baked good, providing the necessary structure and texture. Its moderate protein content allows for the development of gluten, which helps the tea buns rise and maintain their shape. For the best results, sift the flour before measuring to aerate it, ensuring a light and fluffy final product.
Sugar
Sugar not only adds sweetness to the tea buns but also plays a crucial role in the browning process during baking. As the sugar caramelizes, it contributes to the golden color and enhances the overall flavor profile. A balance of sweetness is essential, allowing the natural flavors of the other ingredients to shine through.
Baking Powder
Baking powder is a leavening agent that ensures your tea buns rise to fluffy perfection. It works by releasing carbon dioxide gas when it comes into contact with moisture and heat, creating air pockets in the dough. This results in a light texture that is characteristic of well-baked tea buns. Be sure to check the expiration date on your baking powder to ensure optimal leavening.
Salt
Although it may seem counterintuitive, salt is a vital ingredient in baked goods. It enhances the flavor of the tea buns and balances the sweetness of the sugar. Additionally, salt strengthens the gluten structure, contributing to the overall texture of the buns. A small pinch of salt goes a long way in elevating the taste.
Unsalted Butter
Unsalted butter adds richness and moisture to the tea buns, resulting in a tender crumb. The fat content in the butter contributes to flavor and helps to create a desirable texture. Using unsalted butter allows you to control the salt content of your recipe more effectively.
Milk
Milk is essential for hydration and flavor in the dough. It not only adds moisture but also helps to create a tender crumb. Whole milk is often preferred for its richness, but you can use any type of milk you have on hand, including plant-based alternatives.
Egg
Eggs serve multiple purposes in baking, including binding the ingredients together and providing aeration. The proteins in the egg contribute to the structure of the tea buns, ensuring they hold their shape while still remaining soft and fluffy.
Vanilla Extract
A splash of vanilla extract enhances the overall flavor profile of the tea buns, adding warmth and depth. It complements the sweetness of the sugar and pairs beautifully with the other ingredients. For a more pronounced vanilla flavor, consider using pure vanilla extract instead of imitation.
Optional Additions: Raisins/Currants and Nutmeg
To elevate your tea buns further, consider incorporating optional additions like raisins or currants for natural sweetness and texture. These dried fruits provide bursts of flavor that can transform your tea buns into a delightful treat. Additionally, a sprinkle of nutmeg can add a warm, aromatic note, enhancing the overall flavor experience.
Step-by-Step Instructions for Making Delightful Tea Buns
Now that you understand the key ingredients and their roles, it’s time to dive into the step-by-step process of making delightful tea buns. Follow these detailed instructions to ensure your baking adventure is a success:
Prepping the Oven and Baking Sheet
Before you begin mixing your ingredients, preheat your oven to 375°F (190°C). Proper oven temperature is crucial for achieving the desired rise and color in your tea buns. While the oven is warming up, prepare a baking sheet by lining it with parchment paper. This will prevent the buns from sticking and make for easy cleanup.
Mixing Dry Ingredients
In a large mixing bowl, sift together the all-purpose flour, baking powder, sugar, and salt. Sifting not only helps aerate the flour but also ensures that the baking powder and salt are evenly distributed throughout the mixture. Use a whisk to combine the dry ingredients thoroughly, breaking up any lumps as you go.
Creaming the Butter
In a separate bowl, take your unsalted butter and let it soften at room temperature until it is creamy. Using an electric mixer or a sturdy wooden spoon, cream the butter until it is light and fluffy. This process incorporates air into the butter, which contributes to the rise of the tea buns. Aim for a pale yellow color and a texture that resembles whipped cream.
Combining Ingredients
Once the butter is creamed, add the egg and vanilla extract to the mixture. Beat them together until fully combined, ensuring the egg is well incorporated. Gradually add the dry ingredients to the butter mixture, alternating with the milk. Begin and end with the dry ingredients, mixing gently until just combined. Be careful not to overmix; a few lumps are perfectly fine.
Adding Optional Ingredients
If you choose to include raisins or currants, fold them into the dough at this stage. Additionally, if you’re using nutmeg, sprinkle it in to enhance the flavor. The goal is to create a cohesive dough that is neither too sticky nor too dry.
Shaping the Buns
Once your dough is ready, turn it out onto a lightly floured surface. Gently knead the dough a few times to bring it together, but avoid overworking it. Divide the dough into equal portions, shaping each piece into a round bun. Place the buns onto the prepared baking sheet, leaving enough space between each one to allow for expansion during baking.
Baking
With your oven preheated and the buns shaped, it’s time to bake. Place the baking sheet in the oven and bake for 15-20 minutes, or until the buns are golden brown and a toothpick inserted into the center comes out clean. Keep an eye on them as they bake, as oven temperatures can vary.
This marks the beginning of your delightful journey into making tea buns. By following these steps carefully, you will soon be rewarded with a batch of delicious, homemade tea buns that are perfect for any occasion. Stay tuned for the next part, where we will delve into tips for achieving the best results and answer common questions related to this delightful recipe.
Combining Mixtures: The Importance of Gentle Mixing
When it comes to baking delightful tea buns, the way you combine your ingredients plays a critical role in the final texture of the bread. After you’ve prepared your wet and dry ingredients separately, it’s time to bring them together. The key here is to mix gently—this helps prevent overworking the dough, which can lead to tough and chewy buns rather than the tender, fluffy texture we’re aiming for.
To combine the mixtures, start by creating a well in the center of the dry ingredients, then gradually pour in the wet ingredients. Using a spatula or your hands, fold the mixture together with a light touch. Aim to just incorporate the ingredients until there are no dry spots left. A few lumps are okay, as they will generally work themselves out during the shaping and baking processes. Remember, less is more when it comes to mixing; this is the secret to achieving perfectly soft and airy tea buns.
Shaping the Buns: Techniques for Creating Appealing Shapes
Once your dough is combined, it’s time to shape your buns. There are several techniques you can use to create visually appealing and uniform shapes for your tea buns. Here are a few methods to consider:
1. Classic Round Buns: Divide the dough into equal portions, usually about the size of a golf ball. Gently roll each piece into a smooth ball using your palms.
2. Knotted Buns: For a more rustic appearance, take a portion of dough, roll it into a rope about 10 inches long, then tie it into a loose knot. This method adds texture and a charming home-baked look.
3. Twisted Buns: Roll a piece of dough into a long strip and twist it before pinching the ends together. This technique not only looks beautiful but also allows for more surface area, which can create a delightful crust.
4. Flat Buns: If you prefer a different texture, flatten the dough slightly and shape it into a disc. This method yields a denser bun that’s perfect for slathering with butter or jam.
Regardless of the shape you choose, ensure that you place the buns on a lined baking sheet with sufficient space between them. This allows for proper expansion during the rise and bake.
Preparing for Baking: Techniques for Achieving a Beautiful Golden Finish
Before the buns hit the oven, there are a few final touches you can add to ensure they achieve that coveted golden-brown finish. Begin by preheating your oven to 375°F (190°C).
1. Egg Wash: For a shiny and golden exterior, consider brushing the tops of your shaped buns with an egg wash. To make an egg wash, simply whisk one egg with a tablespoon of water or milk and gently brush it over the surface of each bun right before baking.
2. Sprinkle Toppings: If you want to enhance both the flavor and presentation, sprinkle some coarse sugar, seeds, or herbs on top of the egg-washed buns. This provides texture and visual appeal.
3. Allow for Final Rise: Let your shaped buns rest for about 20-30 minutes before baking. This final proofing stage allows the yeast to work its magic, resulting in lighter and fluffier buns.
Baking the Buns: Signs to Look For to Ensure They’re Perfectly Done
When it comes to baking tea buns, timing and observation are key. After about 20-25 minutes in the oven, start checking for doneness. The buns should be golden brown on top, and when you tap the bottom, they should sound hollow. This is a classic baking trick to determine if your bread is done.
Another sign is the internal temperature—using a kitchen thermometer, you can check that the internal temperature has reached around 190°F (88°C). This ensures that the buns are fully cooked and safe to eat. Once they are done, remove them from the oven and let them cool on a wire rack. This prevents steam from building up underneath, which can lead to soggy bottoms.
Cooling and Serving: Best Practices for Enjoying Tea Buns Warm
After your tea buns have baked to perfection, patience is key. Allow them to cool for at least 10-15 minutes before diving in. This cooling period allows the flavors to develop fully and the texture to settle.
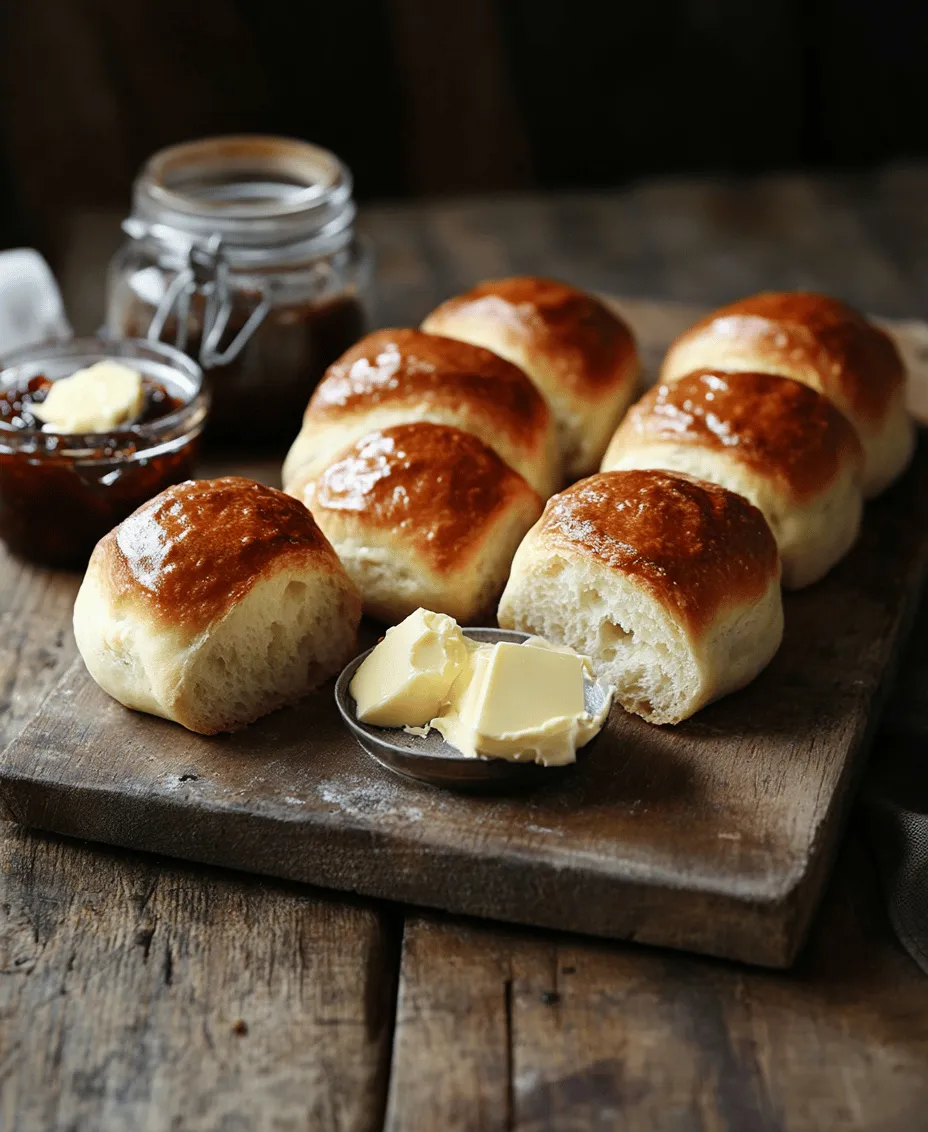
To serve, consider enjoying your tea buns warm. They are delicious on their own or can be paired with an array of spreads. Consider offering options like creamy butter, fruity jams, or tangy preserves. The warmth of the buns will melt the butter slightly, creating an indulgent treat that’s hard to resist.
Variations and Customizations
One of the great things about tea buns is their versatility. You can easily adapt the basic recipe to suit your taste preferences or dietary needs. Here are some variations you might consider:
– Different Flavorings: You can add citrus zest—like lemon or orange—for a refreshing twist. Spices such as cinnamon or nutmeg can introduce warmth and depth to the flavor profile. Vanilla or almond extract can also be delightful additions.
– Alternative Add-ins: If you want to elevate your tea buns even further, consider folding in chopped nuts, dried fruits, or chocolate chips into the dough. Walnuts, cranberries, or dark chocolate can create a unique flavor experience.
– Gluten-free Options: For those with gluten sensitivities, you can substitute all-purpose flour with a gluten-free blend. Ensure the blend contains xanthan gum to mimic the elasticity of traditional dough.
– Adjusting for Dietary Restrictions: If you need to adjust the recipe for dairy restrictions, consider using plant-based milk and vegan butter. This allows everyone to enjoy the deliciousness without compromising their dietary preferences.
Serving Suggestions and Pairings
To enhance your tea bun experience, consider the beverages and accompaniments that pair well. Here are some suggestions:
– Ideal Beverages: Tea buns are traditionally enjoyed with a cup of tea. Opt for herbal tea for a soothing experience, or choose black tea for a more robust pairing. Green tea can also serve as a refreshing contrast.
– Coffee Pairings: For coffee lovers, a light roast or a flavored coffee can complement the sweetness of the buns. Consider serving your tea buns alongside a rich espresso or a creamy latte for a delightful treat.
– Recommended Spreads and Toppings: Beyond butter, think about offering a selection of jams, marmalades, or honey. Seasonal fruit spreads can enhance the flavor and add a homemade touch.
Storing and Reheating Tea Buns
If you find yourself with leftover tea buns, proper storage is essential to keep them fresh. Here are some best practices:
– Storing Leftovers: Allow the buns to cool completely before storing them. Place them in an airtight container to prevent moisture loss. If you’re storing them for more than a few days, consider refrigerating them.
– Reheating Methods: To maintain the buns’ texture, reheating is best done in the oven. Preheat your oven to 350°F (175°C), place the buns on a baking sheet, and warm them for about 5-10 minutes until heated through.
– Microwave Option: While the microwave can be convenient, it tends to make bread a bit chewy. If you choose this method, heat for short intervals of 10-15 seconds to avoid overcooking.
Conclusion
Making delightful tea buns is not only a rewarding baking experience but also a wonderful way to share joy with family and friends. The process of mixing, shaping, and baking transforms simple ingredients into something truly special. Don’t hesitate to explore the various flavor and texture options to find your perfect version.
Whether you enjoy them fresh out of the oven or experiment with different combinations, these tea buns are bound to please. So gather your ingredients, put on your apron, and relish the joy of baking and sharing homemade treats with your loved ones. With every batch, you not only create delicious buns but also lasting memories that will be cherished around the table.
Tea Buns Recipe
Ingredients