

Introduction
Valentine’s Day is a time for love, romance, and heartfelt gestures. Each year, couples around the world celebrate their affection through various traditions, and sharing food is one of the most cherished customs. Whether it’s a lavish dinner at a fancy restaurant or a cozy night in, the act of preparing and sharing a meal holds a special place in our hearts. This Valentine’s Day, why not elevate your culinary game with a delightful twist? Heart-shaped breadsticks are not just a creative way to show your affection; they are a simple yet delicious addition to your romantic dinner table.
These charming breadsticks are a wonderful way to express your love without the need for extensive baking skills. They are easy to make and require only a handful of ingredients, making them accessible for home cooks of all levels. With their warm, golden crust and soft, chewy interior, these heart-shaped breadsticks will undoubtedly impress your loved one and add a personal touch to your Valentine’s Day celebration.
Understanding the Ingredients
Before diving into the heart of the recipe, it’s essential to understand the key ingredients that will transform basic dough into delightful heart-shaped breadsticks. Each component plays a crucial role in ensuring the final product is flavorful, textured, and visually appealing.
Flour
Flour is the backbone of any bread recipe, serving as the foundation for our heart-shaped breadsticks. The type of flour you choose can significantly impact the texture of the breadsticks. All-purpose flour is commonly used for its versatility and balance of protein content, which provides the right structure for the dough. The gluten formed during kneading gives the breadsticks their chewiness, so it’s essential to select a flour that meets your baking needs.
Yeast
Active dry yeast is a vital ingredient in this recipe, acting as the leavening agent that causes the dough to rise. The yeast ferments, producing carbon dioxide that creates air pockets in the dough, resulting in a light and airy texture. When using active dry yeast, it’s crucial to activate it properly to ensure it’s alive and ready to work its magic. This involves dissolving it in warm water with a small amount of sugar, which feeds the yeast and kickstarts its fermentation process.
Water and Sugar
Water is another essential ingredient that hydrates the flour and activates the yeast. The temperature of the water is critical; it should be warm—not hot—to create the ideal environment for the yeast. Additionally, adding a bit of sugar to the water helps activate the yeast more effectively, enhancing both the flavor and the rising process of the dough.
Olive Oil and Seasonings
Olive oil not only adds richness to the breadsticks but also contributes to their tenderness. As the oil coats the flour particles, it prevents excessive gluten formation, resulting in a soft and flavorful breadstick. When it comes to seasonings, a pinch of salt enhances the overall taste, while optional ingredients like garlic powder, oregano, or Italian seasoning can be added to elevate the flavor profile. These seasonings provide a savory contrast to the sweetness of the Valentine’s Day theme.
Optional Ingredients
For those looking to take their heart-shaped breadsticks to the next level, consider incorporating Parmesan cheese and fresh parsley. Grated Parmesan adds a savory richness, while finely chopped parsley can provide a pop of color and freshness. These optional ingredients not only enhance the flavor but also make your breadsticks visually appealing, perfect for impressing your special someone.
Step-by-Step Guide to Making Heart-Shaped Breadsticks
Now that we understand the essential ingredients, let’s jump into the step-by-step process of making these delightful heart-shaped breadsticks. With clear instructions and helpful tips, you’ll be ready to create a romantic masterpiece in no time.
Activating the Yeast
The first step in our breadstick-making journey is activating the yeast. This crucial process ensures that the yeast is alive and ready to help our dough rise. To activate the yeast, follow these simple steps:
1. Warm the Water: Begin by measuring out warm water—ideally between 100°F to 110°F (38°C to 43°C). If you don’t have a thermometer, you can test the water with your finger; it should feel warm but not hot.
2. Add Sugar and Yeast: In a small bowl, combine the warm water with a teaspoon of sugar and sprinkle the active dry yeast on top. Allow it to sit for about 5-10 minutes. During this time, you should see the yeast foam up, creating a frothy layer on the surface. This indicates that the yeast is active and ready to use.
3. Check for Signs of Activation: The yeast should have a bubbly, frothy appearance and a pleasant, slightly yeasty aroma. If there is no foam after 10 minutes, it may mean the yeast is inactive, and you should start again with a fresh batch.
Preparing the Dough
With our yeast activated and bubbling, it’s time to prepare the dough. The key here is to combine the ingredients effectively to create a cohesive mixture.
1. Mix the Dry Ingredients: In a large mixing bowl, combine the flour and salt. Stir them together to ensure even distribution.
2. Create a Well: Make a well in the center of the flour mixture. This will be where you add the yeast mixture and olive oil.
3. Add the Yeast Mixture: Pour the activated yeast mixture into the well, followed by the olive oil. Using a wooden spoon or your hands, begin to mix the ingredients together. Start by incorporating the flour from the edges of the well into the wet mixture until a shaggy dough begins to form.
Kneading the Dough
Kneading is a crucial step that develops the gluten in the dough, giving our breadsticks their desired texture. Here’s how to knead effectively:
1. Transfer to a Clean Surface: Once the dough begins to come together, transfer it to a lightly floured surface.
2. Knead the Dough: Using your hands, push the dough away from you with the heel of your hand, fold it over, and give it a quarter turn. Repeat this process for about 8-10 minutes. The goal is to achieve a smooth, elastic consistency. If the dough is sticky, sprinkle a little more flour as needed, but be careful not to add too much, as it can result in dense breadsticks.
3. Check for Proper Consistency: The dough should be soft and slightly tacky but not overly sticky. When you poke it with your finger, it should spring back gently.
This initial preparation will set the stage for your heart-shaped breadsticks, creating a delightful texture and flavor that will impress your Valentine. As we move forward, we’ll explore shaping and baking these romantic breadsticks, ensuring they become the highlight of your Valentine’s Day dinner. Stay tuned for the next steps in this delicious journey!
First Rise
The first rise is a crucial step in the bread-making process, playing a vital role in developing the texture and flavor of your heart-shaped breadsticks. During this initial fermentation, yeast works its magic, producing carbon dioxide, which causes the dough to expand. This not only contributes to the light and airy texture of the breadsticks but also enriches their flavor profile.
To achieve the best results, place your dough in a warm, draft-free area. An ideal temperature for rising is around 75°F to 80°F (24°C to 27°C). You can create a perfect environment by turning on your oven to the lowest setting for a few minutes, then turning it off, and placing the dough inside with a damp cloth over the bowl to retain moisture. Allow the dough to rise until it has doubled in size, usually taking about 1 to 1.5 hours, depending on the ambient temperature.
Shaping the Breadsticks
Once your dough has risen to perfection, it’s time to shape it into delightful heart forms. Start by gently punching down the dough to release any air bubbles. Then, turn it out onto a lightly floured surface.
Dividing and Rolling the Dough: Use a sharp knife or bench scraper to divide the dough into equal portions, approximately 2 to 3 ounces each. Roll each piece into a long rope about 12 inches in length. If you want to ensure consistency, you can use a kitchen scale to weigh each piece before rolling.
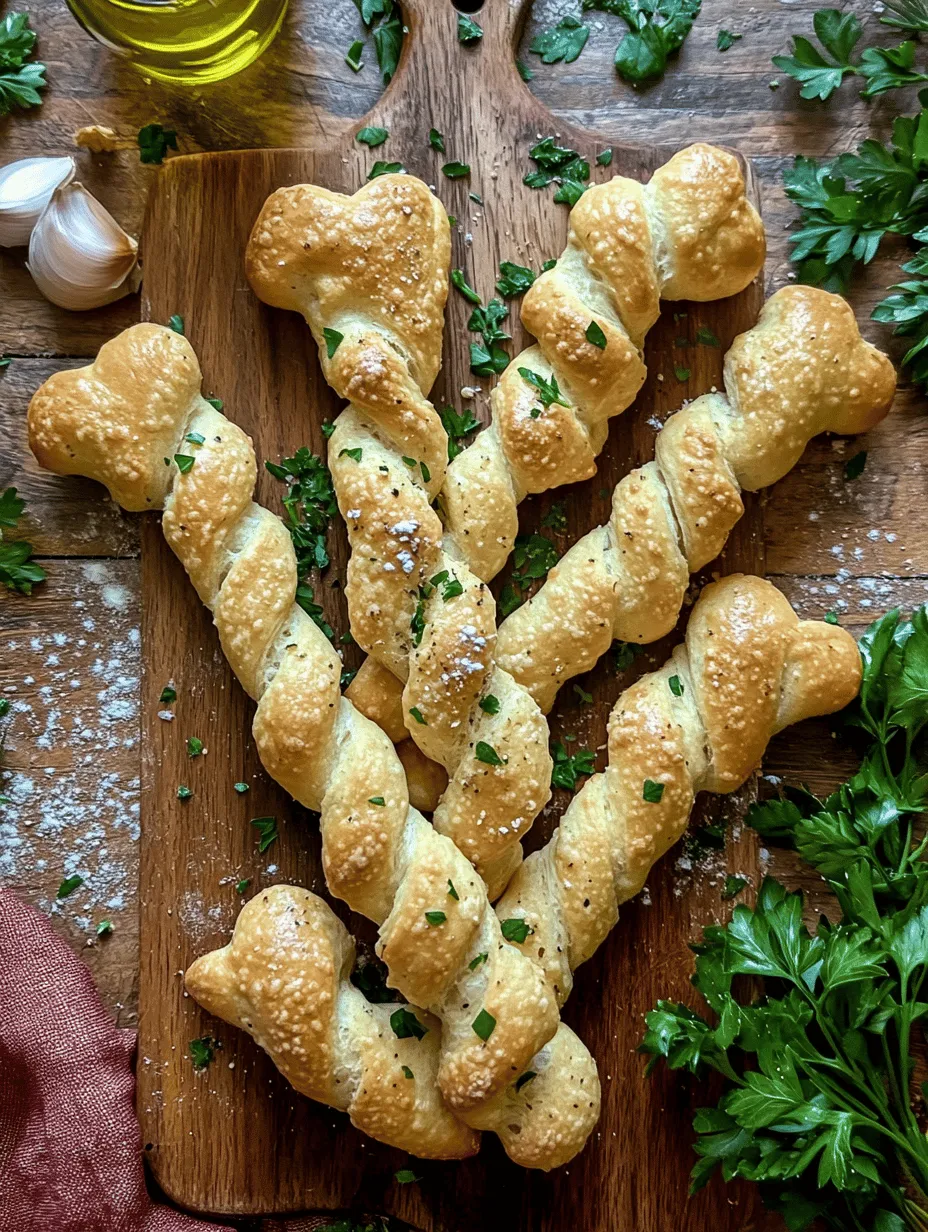
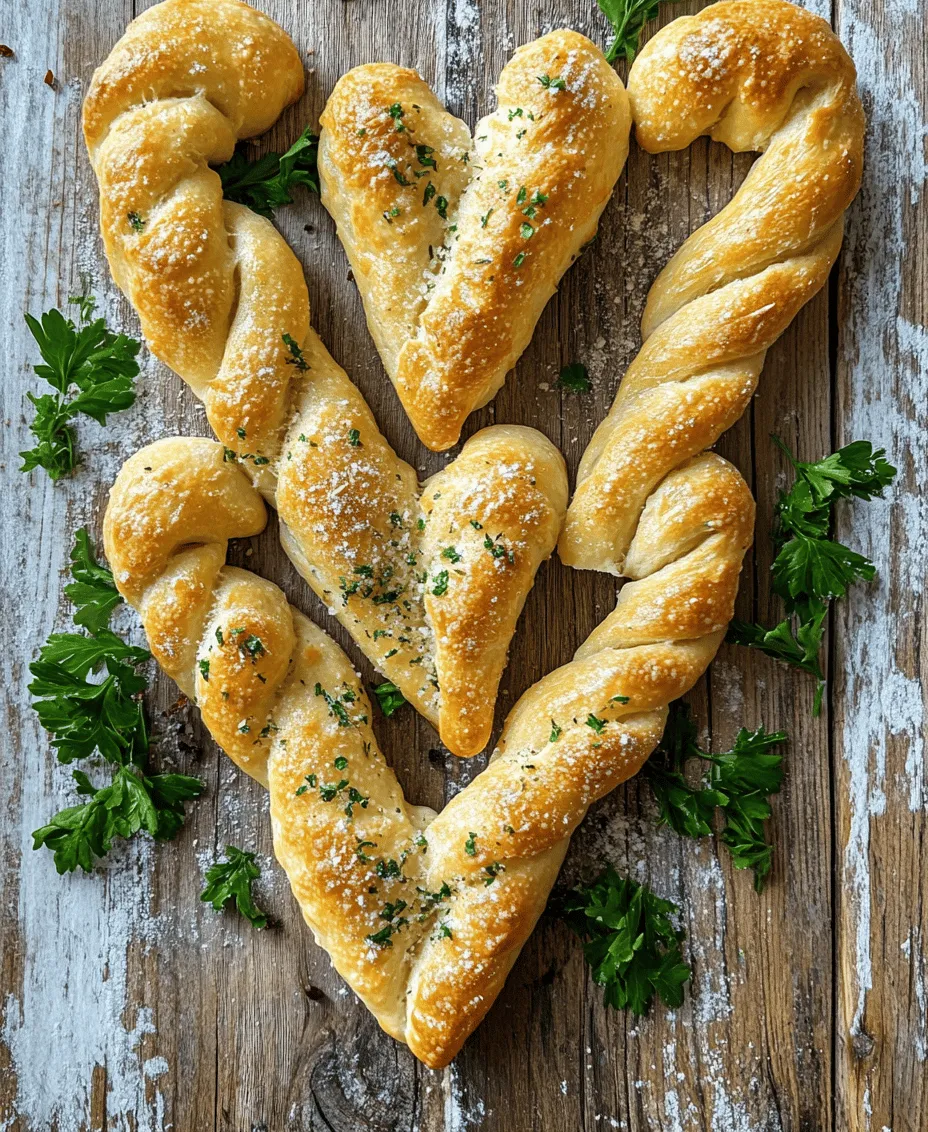
Creating Heart Shapes: To shape the breadsticks into hearts, take one rolled piece of dough and form a loop at one end, pinching it slightly to secure the shape. Then, take the other end of the rope and wrap it around the base of the loop, forming a heart shape. Pinch the ends together to ensure that the heart holds its shape during baking. Repeat this process with each piece of dough, placing the formed heart breadsticks on a parchment-lined baking sheet.
For a visual guide, consider checking online resources or baking videos that demonstrate how to create symmetrical heart shapes. The key is to ensure both sides of the heart are even, which adds to the presentation of your finished breadsticks.
Second Rise and Prepping for Baking
The second rise is just as important as the first. This step allows the dough to relax and expand further, resulting in an even softer texture. After shaping the breadsticks, cover them with a clean kitchen towel and let them rise for another 30-45 minutes in the same warm, draft-free environment.
While the breadsticks are rising, prepare your baking sheet by ensuring it is lined with parchment paper to prevent sticking and promote even cooking.
Preheating the Oven: Preheat your oven to 375°F (190°C) while your breadsticks are finishing their second rise. Preheating is crucial for achieving perfect baking results, as it ensures that the breadsticks will start cooking immediately upon entering the oven, leading to a golden, crispy exterior.
Seasoning and Baking the Breadsticks
With your dough shaped and the oven preheated, it’s time to add flavor. Before baking, brush each heart-shaped breadstick with a generous amount of high-quality olive oil. This not only adds flavor but also helps achieve a beautiful golden color. If desired, sprinkle with coarse sea salt, garlic powder, or your favorite herb blend for added flavor.
Baking Times and Visual Cues: Place the baking sheet in the preheated oven and bake for 15 to 20 minutes. The breadsticks should puff up and develop a lovely golden-brown color. A good visual cue for doneness is when they are lightly browned on top and sound hollow when tapped on the bottom.
Serving Suggestions and Pairings
When it comes to serving your heart-shaped breadsticks, presentation is key. Arrange them on a beautiful platter or in a decorative basket lined with a cloth napkin for a romantic touch. You can serve them alongside a warm marinara sauce or a rich garlic butter dip.
Flavor Pairings: The light, airy texture of the breadsticks pairs beautifully with the acidity of marinara sauce, while the richness of garlic butter complements the breadsticks’ flavor. You might also consider serving them with a sprinkle of freshly chopped herbs for a pop of color and added freshness.
Remember, breadsticks are best enjoyed warm and fresh out of the oven. If you’re preparing them in advance, consider reheating them in the oven or a toaster oven for a few minutes before serving to restore their crispy exterior.
Conclusion
Making heart-shaped breadsticks for Valentine’s Day is not just about the food; it’s about creating an experience filled with joy and love. The simplicity of the ingredients combined with the fun of shaping them into hearts makes this recipe a delightful addition to your Valentine’s celebration.
Feel encouraged to experiment with different flavors, such as adding grated Parmesan cheese, herbs, or spices to the dough before shaping. Personal touches can make the recipe even more special.
Sharing food is an integral part of creating memorable moments in the kitchen and beyond. These heart-shaped breadsticks are sure to be a hit, bringing smiles and satisfaction to everyone who shares in the experience. So roll up your sleeves, get creative, and enjoy the process of making these delightful treats!
Heart-Shaped Breadsticks for Valentine’s Day
Ingredients